Author: Admin

Configuring Network settings for PostgreSQL using Bicep

At work I always get new Azure Services to deploy and I always use Bicep. Here is how to manage network settings for PostgrSQL flexible server. This is the service one, not the “run on a Linux VM one”. ALWAYS use the service flavor.

Basic PostgreSQL bicep

Getting the Bicep from an existing Azure resource is super simple. Use VS code and the Command Palette (Ctrl+Shift P) and type Bicep: Insert Resource. Bom! There is your Bicep code and to understand it, here is the documentation reference.

Network settings

These are not found in the export and you have to add them manually (not great), but that is because it is a subtype. It is a separate type but can only exist when connected to another type. The definition is not hard to find:

resource symbolicname 'Microsoft.DBforPostgreSQL/flexibleServers/firewallRules@2022-01-20-preview' = {
  name: 'string'
  parent: resourceSymbolicName
  properties: {
    endIpAddress: 'string'
    startIpAddress: 'string'
  }
}

These are the same settings that you would use for an Azure SQL Server, it is just connected to a DBforPostgreSQL flexible server.
Simply add all the IP-ranges you need to allow. Such as “the office in Stockholm” or “the consultant”.

Allow Azure Services

This is a special case and you need to configure a specific rule for it, allowing the IP-range 0.0.0.0 to 0.0.0.0.

resource AllowAzureServices 'Microsoft.DBforPostgreSQL/flexibleServers/firewallRules@2022-01-20-preview' = {
  parent: PostgreSQLDB
  name: 'AllowAllAzureIps'
  properties: {
    endIpAddress: '0.0.0.0'
    startIpAddress: '0.0.0.0'
  }
}

D365 F&O Batch Job done notification

A while ago I posted an easy how-to guide for calling APIs in Dynamics 365 Finance and Operations (or D365 F&O to its friends). In that post I looked for statuses of batch jobs. This is the follow up post on how to get notified when a batch job is done.

Batch job and alerting

You can configure a batch to send you an e-mail when the batch is done, or errored, but an e-mail is not very computer to computer friendly. I needed a response back so the next action (or batch) could be executed.

If you only need an e-mail when a batch is done. I suggest you check out this page.

I am actually surprised that this is not a feature in D365 but it is easy enough to build using Logic Apps.

The D365 APIs

If you need information on connecting to the APIs you can find that in my last post Talking to the D365 F&O Rest APIs.

The secret here is to use two features: A callback Url and a do-while loop.

What is a callback URL?

Glad you asked. When you call an API the operation might take a long time to complete, such as creating a new order or running a batch. Instead of either waiting for a very long time or getting a timeout, you give the call a callback URL. This URL is basically saying “When you are done, reply to this address”.

When calling such an endpoint you supply the callback URL as a header or part of a message body, and the service should reply with a 202 Accepted, meaning “I received your message and will get back to you.”

Setting up a callback URL is not the scope of this post. In my scenario it was handled by Azure Data Factory and was just a tickbox.

The Logic App flow

Your exact needs may differ, but we decided on getting a batch ID and the callBackURL as properties of the POST body.
The flow started the batch using the standard Logic Apps connector.

Then the Logic App simply queries the “Batch Status” in the D365 Data API until the batch is not executing anymore.

When the batch is done, or there is an error of some sort, we respond back using the callback URL.

Here is what the Get Batch Status from Data-API looks like:

Details about the call can be found in the earlier post.

A warning!

This will not work on so called “scheduled batch jobs”. The reason is that if you trigger them, ie set to waiting, they will just continue to wait until the scheduling kicks in. In the Logic App above this will respond back as an error.

If you need to be able to trigger the jobs imediatly, you need to remove the scheduling. But that is kind of the reason why you need to do this anyway.

Tips for testing

If you trigger the Logic App using Postman you cannot really handle the callback and you need to setup another endpoint for your Logic App to respond to. I used RequestBin, which solves this problem 100%.

Conclusion

Setting this up is really easy and I am sure you can do it using Power Automate. I am just a Logic App guys and likes solving things using Logic Apps. Adding this to your Azure Data Factory or similar makes you able to call a pipeline “when the first one is done” instead of using scheduling.

Talking to the D365 F&O Rest APIs

The F&O Rest APIs

I decided to rewrite the article(s) from Microsoft about how to communicate with the Rest APIs in D365. The reason being that almost all documentation is written from the perspective of a person who knows a lot about D365 and how it works. If you are like me; you just want the data. I will walk you thru how to setup authentication, how to authenticate and where to find data.

This is probably a bit lengthy, so feel free to use the ToC to read about the thing you need to know.

Setting up authentication

This is done in three parts: Create an application registration (identity), assign access rights, and register in D365.

Create an application registration

This is very similar to how you usually handle autheticating to Azure APIs. Setup an App Registration with a client secret. I made a Just make it work post on this.

Assign Access Rights

This is easier than you might think. In the left menu click API Permissions.

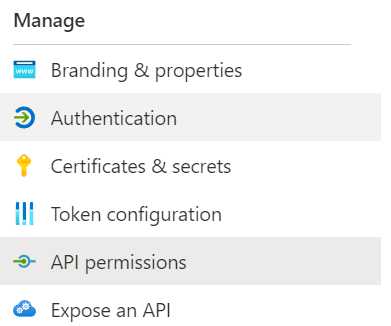
Then find and click + Add a Permission.

In the flyout menu to the right scroll down and find the Dynamics ERP option.

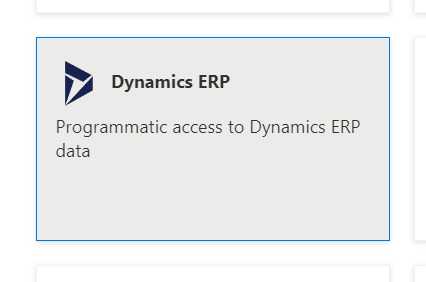
Click on Delegated permissions and select all options. Yeah this seems like too much but according to the official documentation it is ok.

Register in D365

This is straight forward. Just follow the official documentation:

  1. In Finance and Operations apps, go to System administration > Setup > Azure Active Directory applications.
  2. Select New.
  3. Fill in the fields for the new record:
    • In the Client Id field, enter the application ID that you registered in Azure AD.
    • In the Name field, enter a name for the application.
    • In the User ID field, select an appropriate service account user ID. For this example, we have selected the Admin user. However, as a better practice, you should provision a dedicated service account that has the correct permissions for the operations that must be performed.
  4. When you have finished, select Save.

Authenticating

In order to authenticate you need to get an OAUTH token, just like with any Microsoft API. However, there are some important differences.
I will be using Postman to create and issue calls.

Preparing Postman

Your life will be much better if you use variables rather than hard coded values. Create the following:

Global

Variable name Value Comment
G_AzureTenantId The Id of your Azure tenant Use the application registration overview page or visit https://www.whatismytenantid.com/.

Environment

Variable name Value Comment
D365clientId Client ID The client Id of the application registration created earlier.
D365clientSecret Client Secret The client secret of the application registration created earlier.
D365InstanceUrl D365 URL The whole URL of the D365 instance you want to communicate with. Includes https at the start of the string. Example: https://myinstancename.testperhaps.dynamics.com
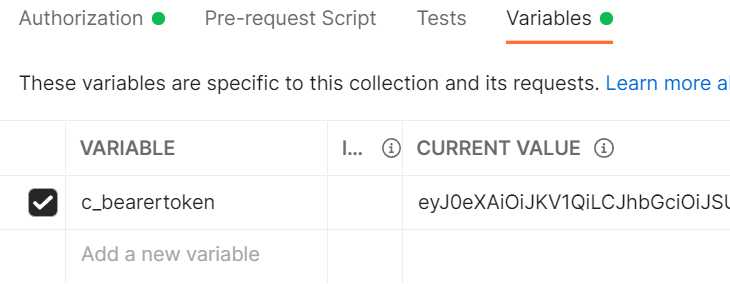
Collection

Variable name Value Comment
c_bearertoken Empty Will contain the OAUTH token after authentication

Setting the URL

You need to create a new POST with this URL https://login.microsoftonline.com/{{G_AzureTenantId}}/oauth2/v2.0/token
This is so Azure AD knows where to route the call, and you need to point it to your Azure tenant.

Create the body

  • Select the “Form-Data” option.
  • Select Bulk Edit (to the right)
  • Paste the following into the window
Client_Id:{{D365clientId}}
Client_Secret:{{D365clientSecret}}
grant_type:client_credentials
scope:{{D365InstanceUrl}}/.default
tenant_id:{{G_AzureTenantId}}

This will use the variables you created earlier.

Create a Test

This is not really a test but a way to get the returned access token into the collection variable c_bearertoken, for use in other calls.
Add this code as a test:

if (pm.response.code == 200) {
    pm.collectionVariables.set('c_bearertoken', pm.response.json().access_token)
}

Test your call

You are now ready to get a token. Click Send. You should receive a 200 OK and a response body like this:

{
    "token_type": "Bearer",
    "expires_in": 3599,
    "ext_expires_in": 3599,
    "access_token": "ey ... KMw"
}

If you want to, you can copy the access token and paste it into the windows at jwt.ms to get more information. The Roles array should contain the roles you assigned earlier. Please note that a token is only valid for one hour. After that you need to get a new one.

Verify that the collection variable c_bearertoken has been populated.

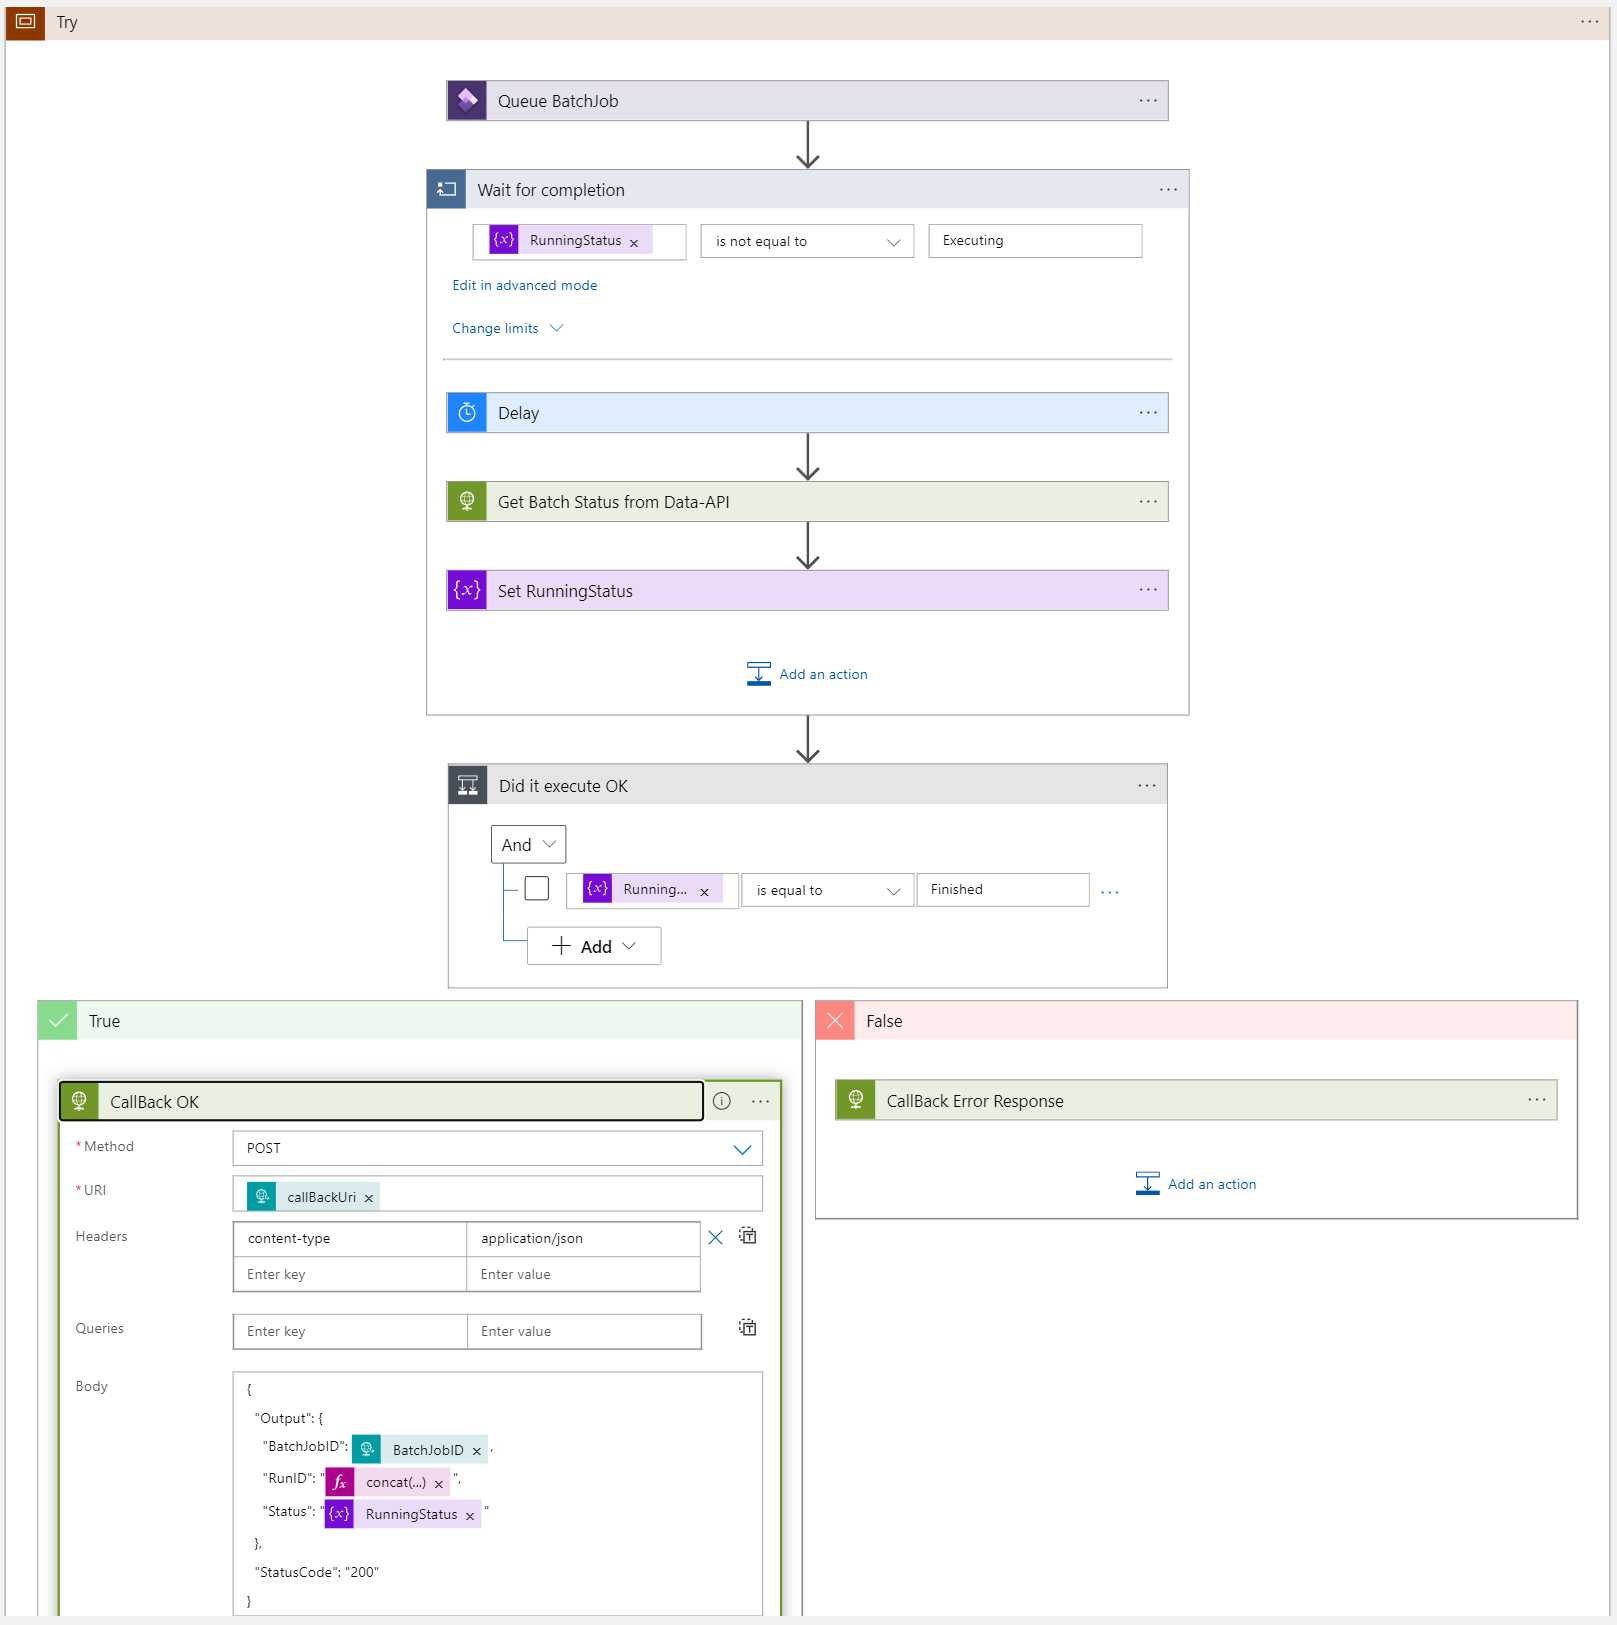
Calling and exploring the data APIs

These APIs can get information about, and to some extent manipulate data in your D365 instance. In my case I want to get the status of a given batch. This scenario will be covered in depth in another post.

To find in-depth information about the D365 data RestAPIs you can try to negotiate the official documentation. This is useful when you need to answer questions like “How to use enums in queries?”

I will use the so called OData endpoint.

Adding authorization to your call

This will be a collection wide setting. Update your collection according to:
Type: Bearer Token
Token: {{c_bearertoken}}

This will add your access token from earlier to all calls.

Construct a call

The basic enpoint is Your D365 Instance/data. In postman create a GET that uses this URL {{D365InstanceUrl}}/data.
Make sure the Authorization option is set to Inherit from parent.

Click send and receive a huuuuge list of all the data objects in your D365 instance.

Exploring the API

Where can I find batch jobs?
I needed to get information about the status of a batch job. In the response body I searched for the word batchjob:

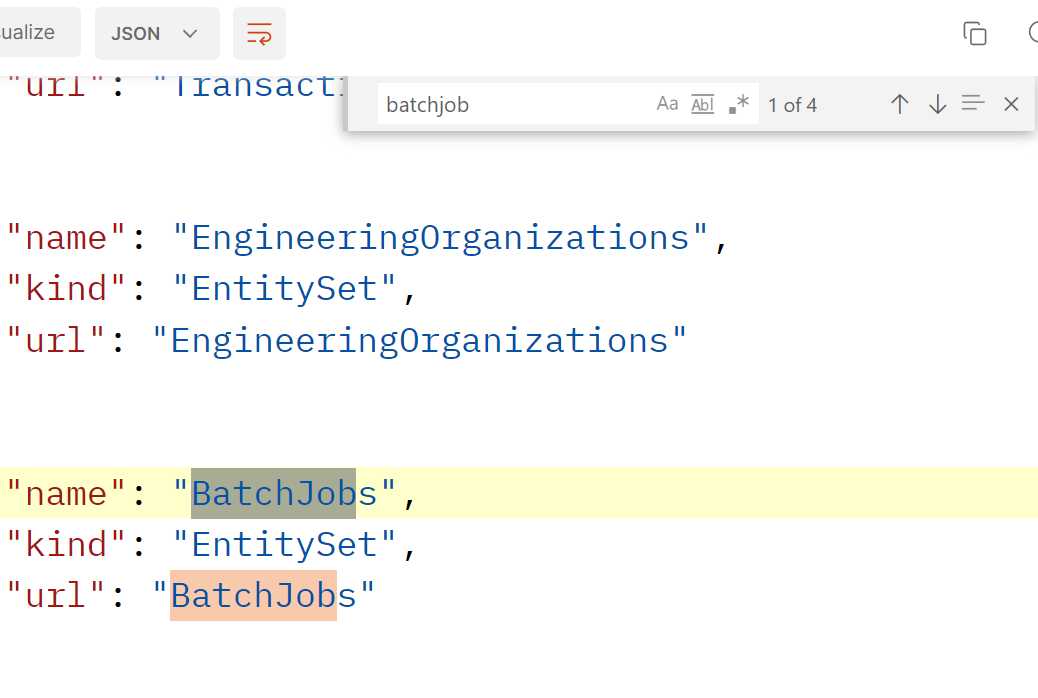
This tells me that there is a data object called BatchJobs. Add it to the URL of the call: {{D365InstanceUrl}}/data/BatchJobs.

VERY IMPORTANT!!! The data object name is case sensitive! {{D365InstanceUrl}}/data/batchjobs returns a 404.

There is a list of all the batch jobs!
The call to list the batch jobs took 15 seconds and the list is very long, but looking at each entity there is a Status field. This is what I need. Now, can I get the status of a single batch job?
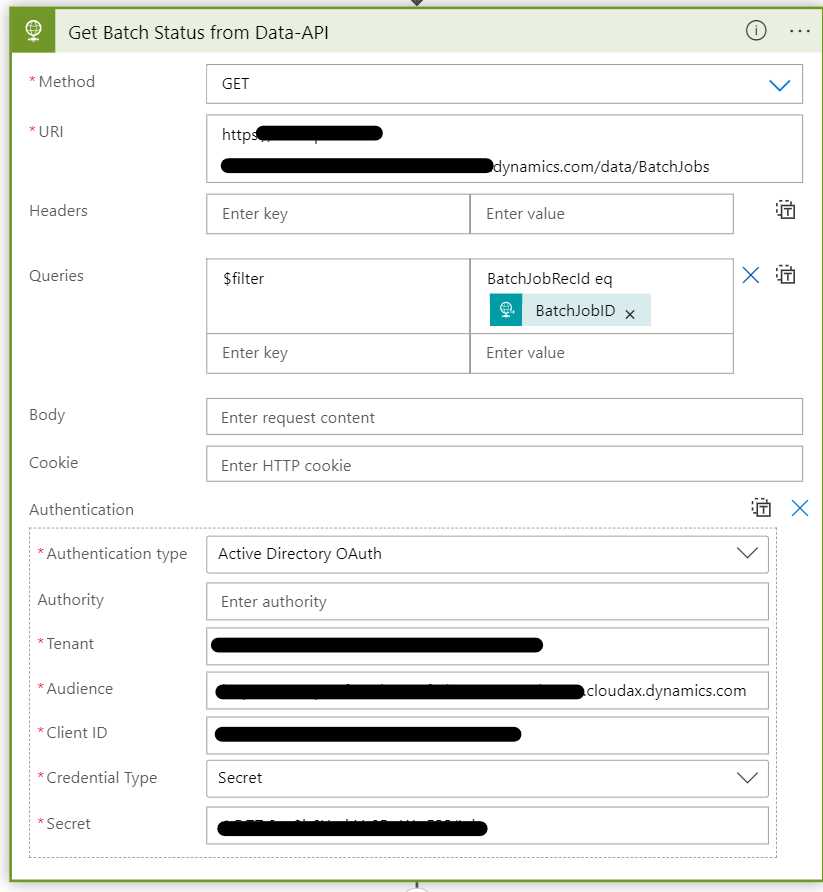
Using $filter?

According to the documentation you can use all kinds of sorting and filtering, which is very good but also something I expect from an OData API.

If I want to find information on Batch Job 5637515827 I can filter for BatchJobRecId using standard API filter syntax.

Update the URL to {{D365InstanceUrl}}/data/BatchJobs?$filter=BatchJobRecId eq 5637515827. This will return an array with the specific ID.

More exploration

Now that you know how to do the basic things, like authenticating and navigating the APIs, you should be able to get all kinds of information about the state of your D365 instance.

Extracting values from a JWT token in APIm

Extracting values from a JWT

If you know me, you know I like security, and sometimes security means being sneaky.

Why?

Recently we needed to identify the user of an incoming call in a backend function. Basically different rules should apply depending on which user was calling the API.

This API is protected using OAUTH 2.0 and as such has a JWT-token sent to it, and using this token is much more secure that simply using the subscription key. More secure since it implies that the caller has authenticated using your AAD.

How?

In the Token there is a property called Subject. This property is the immutable ObjectID of the calling client. This ID can be used to identify the caller.

The scenario called for the backend service to receive this ID as a header. You have to place the JWT extraction after the JWT validation. That way you do not only know you are dealing with a proper token before sending data to the backend system but the validation contains a way of surfacing the JWT token as a variable.

<validate-jwt header-name="Authorization" 
              failed-validation-httpcode="401"
              failed-validation-error-message="Token is invalid" 
              output-token-variable-name="jwt-token">
    <openid-config url="{{my-openid-configuration-url}}" />
    <audiences>
        <audience>{{myAudienceGUID}}</audience>
    </audiences>
    <issuers>
        <issuer>{{myIssuer}}</issuer>
    </issuers>
</validate-jwt>
<!-- Extract the subject and add it to a header -->
<set-header name="caller-objectid" exists-action="override">
    <value>@(((Jwt)context.Variables["jwt-token"]).Subject)</value>
</set-header>

There are some things to point out in this code.
On row 4: I name the output variable to jwt-token. This is how I access the token later.
On row 15: Be sure to override any attempts to set this header from the caller.
On row 16: You need to type the variable jwt-token as Jwt before accessing the property Subject.

More info

The official docs on Validate Jwt.
An official (not that great) example of using JWT values in a policy.

The Jwt class in APIm

It is kind of hard to find as you need to search for jwt on this page. So here they are:

**Algorithm**: string
**Audiences**: IEnumerable<string>
**Claims**: IReadOnlyDictionary<string, string[]>
**ExpirationTime**: DateTime?
**Id**: string
**Issuer**: string
IssuedAt: DateTime?
**NotBefore**: DateTime?
**Subject**: string
**Type**: string

Mapping OPGW Gateway versions

The trouble with OnPrem gateway services

Everyone that have been running the On Premise Data gateway for a while notice that the windows service that is installed on the machine needs to be updated. Microsoft releases a new version about once a month, and in order to maintain support, you need to update about every six months. Updating is a rather manual affair but there is another problem: Knowing which machines that needs to be updated.

The problem

You are running some known, or unknown, number of on premise data gateways in your organization. You need to know the names of the machines that host the Gateway services and the current version of the service.

The issue tend to be that gateways are installed just about everywhere and with little to no documentation. This is one of its main features: The flexibility. Much better than having to go thru the boring rigours of the network.

So you are tasked with finding all the gateways and make sure they are updated. This post help you find the gateways.

Solving it using different tools

There is usually several ways of solving a problem and this is no exception. I will show three different tools and the limitations of each.

Using the Azure Portal

One way of finding the machine name is to use the portal. Find the gateway, look at the overview page and the machine name is right there. However, that is it. You cannot see the service version or if that service version is new or old. You cannot even see if the service is online or not.

So, using the portal is not recommended.

Using the Power Platform Admin center

This very useful management tool actually contains all the information you need, but not in a very mapping-friendly way.

When you log in you get a nice long list of all your gateway clusters for the default region.

You can even get the status (online?) by clicking the arrows symbol to the right, and get the machine name and statuses by clicking the i-symbol next to the clustername in the list.

You can get the machine name in the “device” column and also get the gateway version.

There are some drawbacks though:

  • If you have gateways in multiple regions, you need to switch between them all the time. There is no listAll option.
  • If you have many installations there is a lot of clicking just to get the status.
  • You still do not know if the version is old enough to need an upgrade.

Using a custom script

As luck would have it, I have made a custom PS-script that solves these issues. You can find it on my GitHub page.

The team at Microsoft released a PowerShell Module that allows you to script information about your gateway clusters and machines, so that is what I did. You can download the script and simply run it. I will walk thru the script here.

1. PowerShell 7.x

You need to run this script on PowerShell 7.x, since that is required by the Microsoft module.

2. Download/Install the Gateway Module

Easy, just type Install-Module DataGateway and go thru the setup.

3. Login to be able to access the gateways

Type: Login-DataGatewayServiceAccount and login using the account that is granted access to gateway management.
You will only get information about the gateways you are allowed to view. This means that in some cases you might think that there are no gateways, but it’s just your limited access rights.

4. Update the regions array

On row 9 there is an array that contains all the regions you want to map. If you know you only have gateways in eastus, then put that in the array.

As ever, items in an array in PowerShell is separated by a comma.

The region names are the official Azure Region Names.

Here is an example of multiple regions.

$regions = @('northeurope','francecentral','australiaeast')

4. The script

Have you ever done any PowerShell scripting you will see that it is very straight forward:
– For each region: Get All clusters.
– For each cluster: Get Status and Member Gateways.
– For each member gateway: Get the gateway name and machine name.
– Add the row to an output object.
– When done: save the output object to a CSV-file.

5. The output

Beside the obvious ones, like clustername, there are some additional fields that you will find useful.

Header Description
GatewayMachines A list of all the machinenames connected to the cluster (hosting a gateway service)
Cluster Status Is it online (live) or not?
Version Status If “Update is required”: Update your gateway installation.

Conclusion

You can use the PowerPlatform Admin Center to get almost all the information you need, but the powershell module provides even more and using that in a PowerShell script, you can create a very useful overview of all the gateway installations in your organization.