Month: November 2019

Logic Apps, storage and VNETs

Recently I had the opportunity to use Logic Apps in a much more “locked down” Azure environment, than I am used to, and I found some interesting things.

Logic Apps support for VNET

Famously, your Logic Apps share the space with other customers on its servers as it is a share service. This makes it very easy to maintain and very cheap to run enterprise grade stuff. But famously Logic Apps cannot be assigned to a particular vnet. This does not hold true for the Logic Apps ISE, but that was off the table in this case.

This does not mean that it is unsecure, and this client made it possible to use Logic Apps despite the locked down environment as long as we:

  • Accessed all Logic Apps thru another service connected to a vnet. In this case we used Azure API management Premium.
  • Whitelisted only the APIM’s IP-address for a Logic App, unless
  • The Logic App was called by another Logic App, in which case we used that option.

Limits of Logic Apps

First off you should always have the Logic Apps Limits and Config in your favorites, not because you often hit them, but you should be aware that there are limits. One section is particularly interesting in this case, the one on firewall configuration and IP-addresses.

Allowing access to a resource

When you want to open a firewall for Logic Apps deployed in a particular region, you look up the IP addresses in this list and configure the firewall/network security group. This means that the resource is then potentially available to all Logic Apps in that region. Therefore, you need to protect the resource with an additional layer, such as a SAS-key.

This is how we allowed access between our Logic Apps, and the Azure SQL server instance. In that case we also used credentials as an additional layer.

To allow access you simply need to find your region in the list and then allow exceptions for the IP-addresses listed.

Allowing access to a storage

Now here is when things started to “head south”.

Thanks to a support case I generated the text has been updated and it now reads (my formatting for emphasis):

Logic Apps can’t directly access storage accounts that use firewall rules and and exist in the same region. However, if you permit the outbound IP addresses for managed connectors in your region, your logic apps can access storage accounts that are in a different region except when you use the Azure Table Storage or Azure Queue Storage connectors. To access your Table Storage or Queue Storage, you can use the HTTP trigger and actions instead. 

What you need to do

If you are using blob or file storage, you do not need the last step, but if you are using Table Storage or Queue Storage, you need to do all these steps.

The Storage and Logic App cannot be in the same region

Move the Logic App accessing the storage to the paired region. For us, we have the storage in North Europe and the Logic Apps in West Europe.

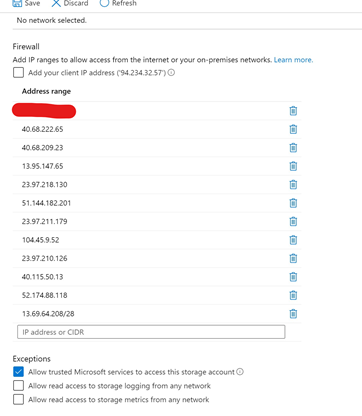
Update the storage firewall to allow IPs from Logic Apps

Finding all the IPs for your Logic App is easy. Just go to this link: https://docs.microsoft.com/en-us/azure/logic-apps/logic-apps-limits-and-config#firewall-configuration-ip-addresses and scroll down to find the Outbound addresses. You need to add all the IPs as well as the Managed Connectors IPs.

Here is a tip: Since you need to add IP-ranges using the CIDR format in the storage firewall, and some IPs are just listed as ranges, you can visit this page to convert them.

Here is another tip: You can find the IP-addresses of the affected Logic App under Properties for the Logic App.

Here is my updated storage firewall after adding everything:

If you are using blob and files storage, you are done.

Update your Logic Apps for Table Storage

We did not use queue storage, so I have no input on that. However, my guess is that it is basically the same.

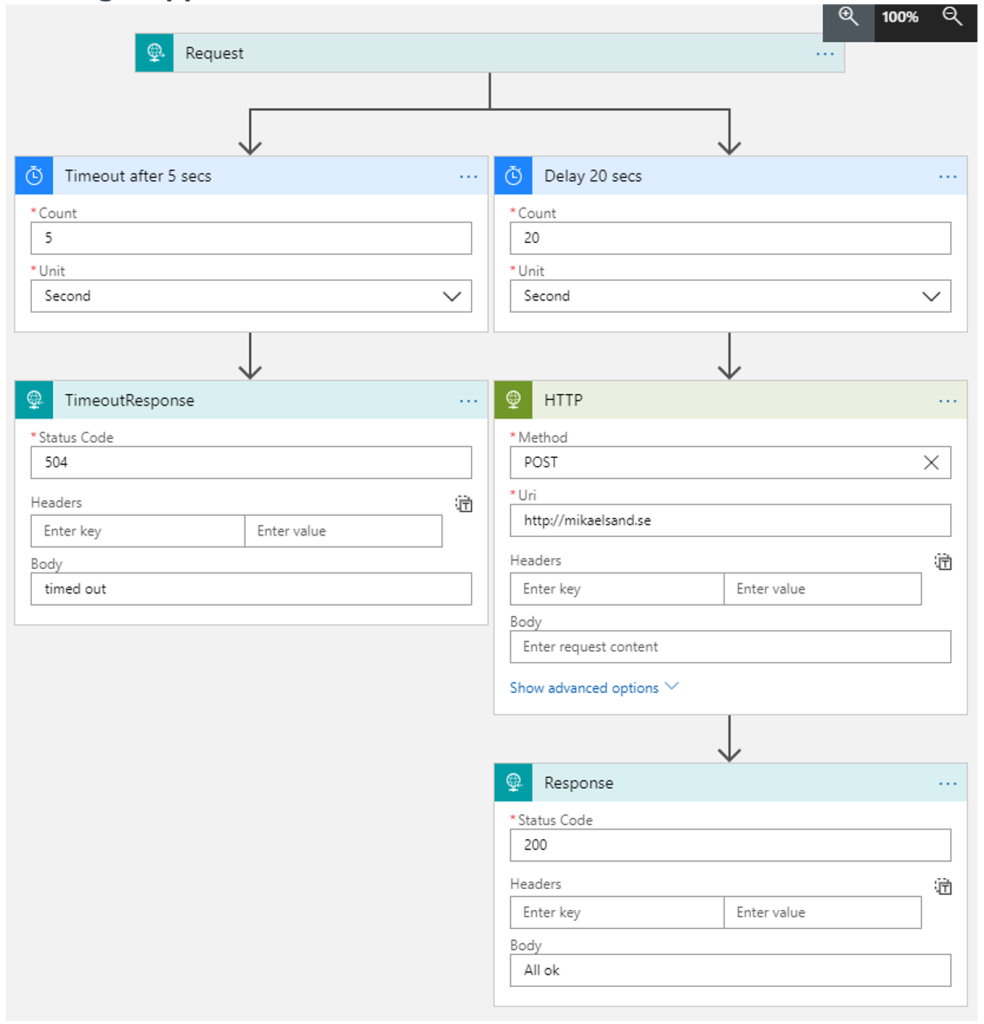
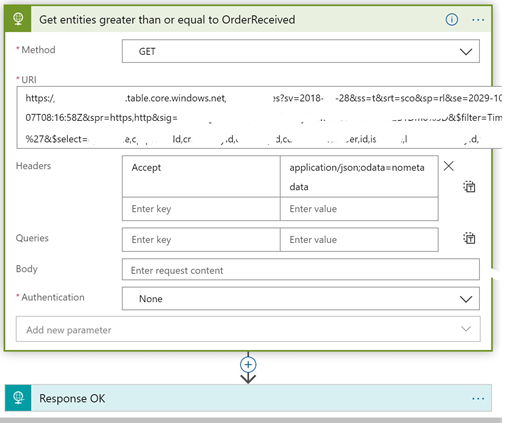
The connector for Table Storage will still not work, so you need to call the API directly. As a matter of fact, I really liked that way much better as it gives a granularity that the connector does not support. The ins and outs of this will be covered in a separate post.

We changed the connector from a Table Storage Connector to an HTTP Connector and configured it like this (sorry for the strange formatting):

he documentation on how to use the API directly can be found here: https://docs.microsoft.com/en-us/rest/api/storageservices/query-entities

To summarize

Having to enable the firewall in an Azure Storage might be necessary. Logic Apps, as well as other Azure Services, has issues with this. To solve it for Azure Table Storage you need to:

  1. Place the Logic App in another region (datacenter).
  2. Use the API directly with the HTTP connector

Storage is a bit strange in some aspects, not only for Logic Apps an strange things can happen.

Simple How-to: Upload a file to Azure Storage using Rest API

There are a lot of different ways to make this happen but, like before, I was looking for the “quick and easy way” to just get it done. So here is a condensed version. Please send me feedback if you find errors or need clarification in any areas. I would also like to point to the official Azure Storage API documentation.

Later update

Since I wrote this post Microsoft has done a lot of work on the permission side of the file service. This means that this post does not support the latest version. The simple and easy way I propose is still usable. You just need to add this header: x-ms-version:2018-11-09. All the examples below uses this header.

Tools

For testing the Rest APIs I recommend using Postman.

Create a file storage

First you need to create a file storage in Azure. More information can be found here

For this I created a storage account called bip1diag306 (fantastic name I know), added a file share called “mystore”, and lastly added a subdirectory called “mysubdir”. This is important to understand the http URIs later in this post.

Create a SAS key

In order to give access to your files you can create an SAS key, using the Azure Portal. The SAS key is very useful since it is secure, dependable, easy to use and can be set to expire at a given time, if you need it.

At the moment, a SAS key created in the portal can only be set for the entire storage account. It is possible to set a particular key for a folder but in that case, you have to use code.

To create an SAS key using the portal, open the overview for the storage account and look in the menu to the left. Find “Shared Access Signature” and click it.

Select the access option according to the image. This will make sure you can create and upload a file.

Make sure the Start date and time is correct, including your local (calling) time zone. I usually set the start date to “yesterday” just to be sure and then set the expiration to “next year”.

Click the “Generate SAS” button. The value in “SAS Token” is very important. Copy it for safekeeping until later.

Create and then upload

The thing that might be confusing is that the upload must happen in two steps. First you create the space for the file, and then you upload the file. This was very confusing to me at first. I was looking for an “upload file” API, but this is the way to do it.

There are a lot more things you can configure when calling this API. The full documentation can be found here. Note that the security model in that documentation differs from the one in this article.

Create

First you need to call the service to make room for your file.
Use postman to issue a call configured like this:

PUT https://[storagename].file.core.windows.net/[sharename][/subdir]/[filename][Your SAS Key from earlier]
x-ms-type:file
x-ms-content-length:file size in bytes
x-ms-version:2018-11-09

Example

If I was tasked with uploading a 102-byte file, called myfile.txt to the share above, the call would look like this:

PUT https://bip1diag306.file.core.windows.net/mystore/mysubdir/myfile.txt?sv=2020-08-04&ss=f&srt=so&sp=rwdlc&se=2021-12-08T21:29:12Z&st=2021-12-08T13:29:12Z&spr=https&sig=signaturegoeshere
x-ms-type:file
x-ms-content-length:file size in bytes
x-ms-version:2018-11-09

Upload

Now, it is time to upload the file, or to fill the space we created in the last call. Once again there is a lot more you can set when uploading a file. Consult the documentation.

Use postman to issue a call configured like this:

PUT https://[storagename].file.core.windows.net/[sharename][/subdir]/[filename]?comp=range&[Your SAS Key from earlier] (remove the ?-sign you got when copying from the portal).
x-ms-write:update
x-ms-range:bytes=[startbyte]-[endbyte]
content-length:[empty]
x-ms-version:2018-11-09

Note the added parameter comp=range

Looking at the headers, the first one means that we want to “update the data on the storage”.

The second one is a bit trickier. It tells what part of the space on the storage account to update, or what part of the file if you will. Usually this is the whole file so you set it to 0 for the startbyte and then the length of the file in bytes minus 1.

The last one, is content-length. This is the length of the request body in bytes. In Postman, this value cannot be set but is filled for you automatically depending on the size of the request body, you can simply omit it if you want to. If you are using some other method for sending the request, you have to calculate the value.

If you are using PowerShell, it seems that this value is calculated as well, and you should not define a content-length header. You get a very strange error about the content-type if you try to send the content-length:

The cmdlet cannot run because the -ContentType parameter is not a valid Content-Type header. Specify a valid Content-Type for -ContentType, then retry.

Example

Returning to the 102-byte file earlier, the call would look like this:

PUT https://bip1diag306.file.core.windows.net/mystore/mysubdir/myfile.txt?comp=range&sv=2020-08-04&ss=f&srt=so&sp=rwdlc&se=2021-12-08T21:29:12Z&st=2021-12-08T13:29:12Z&spr=https&sig=signaturegoeshere
x-ms-write:update
x-ms-range:bytes=0-101
content-length: 
x-ms-version:2018-11-09

The requestbody is the file content in clear text.

Limitations

There are limitations to the storage service. One which impacted me personally. You can only upload 4mb “chunks” per upload. So if your files exeed 4mb you have to split them into parts. If you are a good programmer you can make use of tasks and await to start multiple threads. Please consult the Azure limits documentation to see if any other restrictions apply.

Timeout and parallel branches in Logic Apps

Back when I was a BizTalk developer I used something called sequential convoys. Two main features that had to be implemented to use that pattern was a timeout shape, and a parallel branch. The flow either received a new message or it “timed out”, executing some other logic, perhaps sending an aggregated batch to a database.

Looking at logic apps the same pattern does not match 100% but there are still very good uses for parallel actions and clever use of the delay action.

Can a Logic App timeout?

The question is quite fair: How can we get a behavior that makes the Logic App send back a timeout if a run does not complete within a given time frame? In order to illustrate this I have set up a Logic App that takes inspiration from the sequential convoy pattern:

  1. Receives a request
  2. Starts a delay (the timeout) in one branch.
  3. Starts a call to an external service in the other branch.
  4. If the service responds back before the delay (timeout) is done, HTTP 200 is sent back.
  5. If the service does not respond back in time, HTTP 504 (Gateway timeout) is sent back.

For demo reasons I have added another delay shape to the “call the service”-branch to make the call take too long, and to trigger the timeout.

The Logic App

If the TimeoutResponse triggers, the Logic App engine will recognize this and it will not try to send the other response. That action will be skipped. If you execute the Logic App and this happens the run will be marked as “Failed” in the run history, which then in turn points to a timeout.

The json for the Logic App can be found here.

Some caveats and perhaps better solutions

Note that in this Logic App, the HTTP call to the service will still be executed, even if TimeoutResponse will execute. That can be fixed using the Terminate action.

Lastly you also should think about why you need to implement a timeout in a Logic App. Can’t the calling client set a timeout on their end? If not, why? Can this be solved in some other way? If there is a risk of timing out, can you rebuild the messaging paths in a more async (webbhook) manor? One call from the client starts one process and another Logic App sends the result when the processing is done.

Lastly

I might find scenarios when this is very useful. I have yet to find it but it is nice to know that it’s there and how it behaves.