Everyone knows that the internet is a scary place, and we also know that our APIm instance resides on it, then again, we know that, despite the obvious lack of a firewall, it still works just fine. So why should you add a firewall in front of your APIm instance?
The answer is simple: Added security and features, all provided by the Azure Application Gateway, or AppGw.
Let me go thru some of the main points of this architecture, then I will show you how to implement it.
Network vs service based?
This post is meant for a scenario in which the APIm instance is not network based. You can use this together with the standard edition, and still make the network huggers happy because you can use things like IP-whitelisting. If you are using the premium version of APIm you should set it up according to some other architectural walkthrough.
The AppGW needs a network, you just do not implement it if you do not want to.
The Azure Front door
Let us get this out of the way early. The Azure Front Door, or AFD, is a very useful router and firewall. It is a global service, and it is easy to use. Why not put that in front of your APIm instance?
According to this very handy flowchart. The AFD is meant to be a load balancer in front of several instances. The AppGw has some routing but if you have multiple instances of APIm, I really think you should be using the APIm premium offering instead. The AppGw is more of a router, and not so much a load balancer.
Overview
The communication overview of the setup looks something like this:
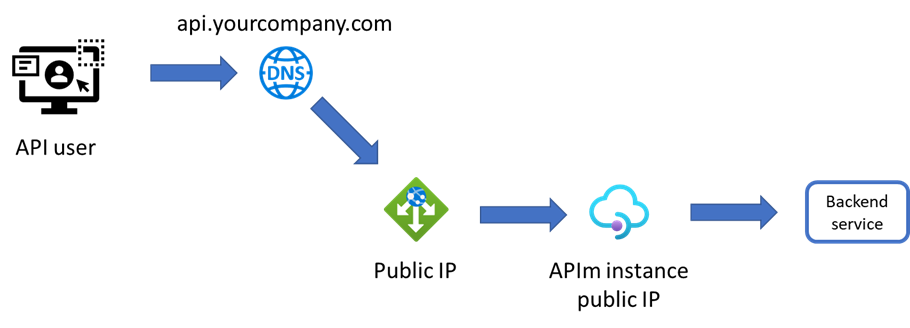
- The API user calls your API at api.yourcompany.com/orders/salesorder send a salesorder.
- The call is routed to the local DNS that hosts the yourcompany.com domain. In that DNS, there is a CNAME that points to the public IP address of the AppGw.
- The gateway receives the call and routes it to the APIm instance’s public IP address.
- Now the call can be sent anywhere the APIm instance has access to. Perhaps an external SaaS or an internal resource via a firewall or something else.
AppGw is a great product for placing at the very edge of your internet connected services. Here are some good reasons.
The WAF
The Web Application Firewall, or WAF, is a firewall designed to handled API, or webcalls. Besides mere routing you can also configure it to look at messages, and headers so that they confirm with what is expected. One example is that it can see if the payload is valid JSON if the header content-type is set to application/json.
But the best thing is its support of rules based on the recommendations from OWASP. This organization looks at threats facing the internet and APIs, such as SQL injection or XML External Entities. Its Top 10 Security Risks is a very good place to start learning about what is out there. The only thing you need to do is to select OWASP protection from a dropdown and you are good to go. Security as a Service at its finest.
Sink routing
One popular way of setting up any kind of routing is to default all calls to a “sink”, i.e. the void, as in no answer, unless some rule is fulfilled. One such rule is a routing rule. This rule will only allow paths that confirm to specific patterns and any other sniffer attempt by any kind of crawler is met with a 502.
A rule that corresponds to the example above might be /orders/salesorder*. This allows all calls to salesorder but nothing else, not even /orders/.
Logging
I will not go that much into any detail here, but you can get access to everything that is sent thru the WAF. Each call ends up in a log which is accessible using Log Analytics and as such you can do a lot of great things with that data.
Setting it up
There are many cool things you can do. I will show you how to setup the most basic of AppGw.
The start
You need to complete the basic settings first. Here is how I setup mine.
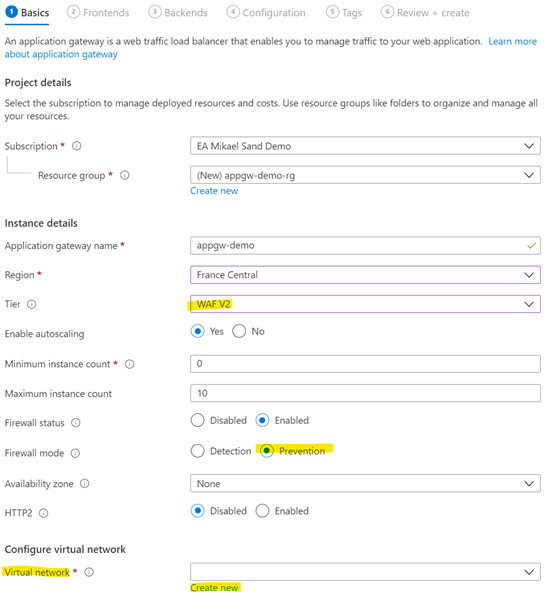
Make sure that you select the right region, then make sure you select WAF V2. The other SKUs is either old or does not contain a firewall, and we want the firewall.
Next, enable autoscaling. Your needs might differ but do let this automated feature help you achieve a good SLA. It would be bad if the AppGw could not take the heat of a sudden load increase if all other systems are meant to.
Firewall mode should be set to prevention. It is better to deny a faulty call and log it, instead of letting it thru and logging it.
Network is a special part of the setup, so it needs its own heading.
Network
You need to connect the AppGw to a network and a Public IP, but you do not need to use the functionalities of the network.
Configure a virtual network that has a number of IP-addresses. This is how I set it up:
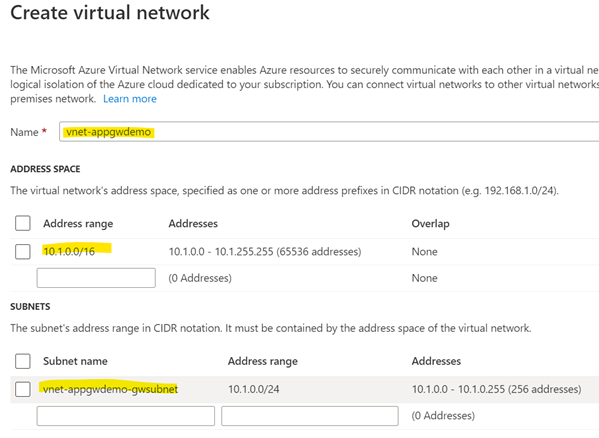
Now you are ready to click Next:Frontends at the bottom.
Frontends
This is the endpoints that the AppGw will use to be callable. If you need an internal IP address you can configure that here.
I have simply added a new Public IP and given it a name. For clarity, the picture contains settings for a private IP but that is not needed of you only need to put it in front of APIm.
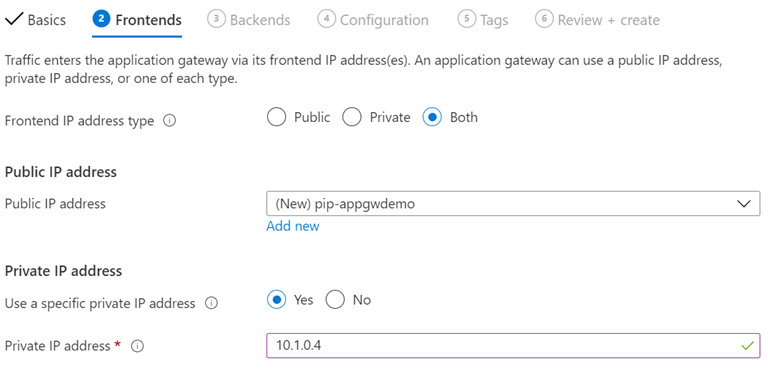
Click Next:Backends at the bottom.
Backends
It is time to add the backend pools. This can be multiple instances of APIm or another service that will be addressed in a “round robin pattern”, so load balancing yes, but in a very democratic way. Therefore, you should not really use it for those scenarios described earlier.
Just give it a name and add the APIm instance using its FQDN.
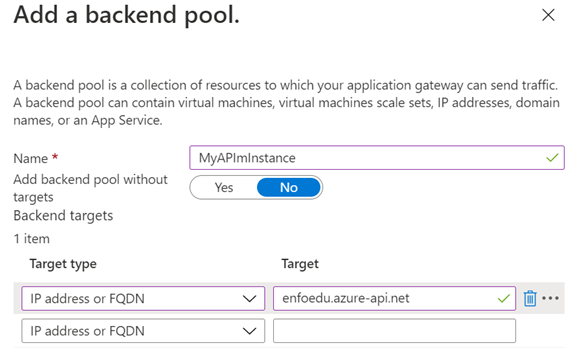
When you are done, click Next:Configuration.
Configuration
This is … tricky and filled with details. Be sure to read the instructions well and take it easy. You will get thru it.
Add a listener
- Start by adding a routing rule. Give it a name. I will call mine apim_443.
- Next you need to add a Listener. Give it a good descriptive name. I will call mine apim_443_listener.
- Choose the frontend IP to be Public and choose HTTPs (you
do not ever run APIs without TLS!)
This is the result
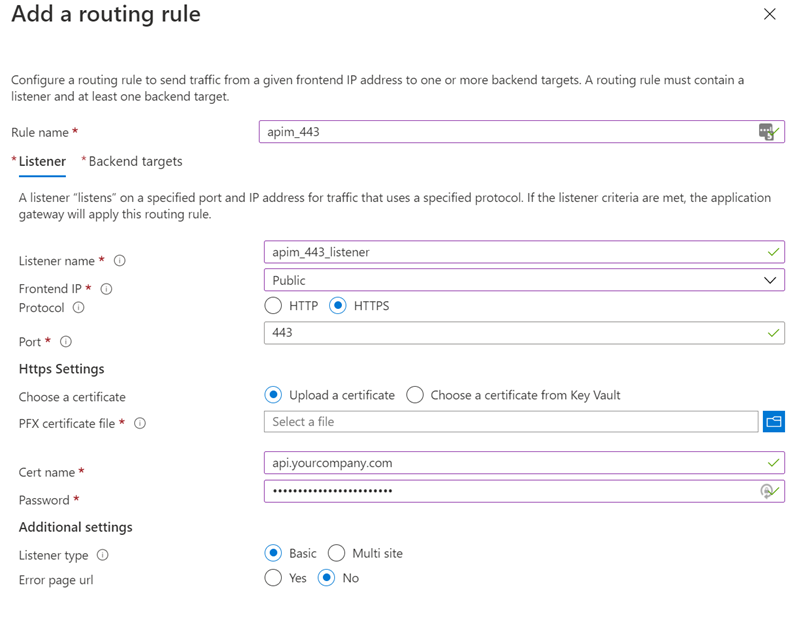
Note that there are several ways to add the certificate. The best way is to use a KeyVault reference.
Configure backend targets
Next, you shift to the Backend targets tab.
The target type is Backend Pool. Create a new backend target and call it Sink. More on this later.
Next you need to configure the HTTP Setting. I know it is getting tricky but this is as bad as it gets. Click the Add New under HTTP Setting
HTTP setting
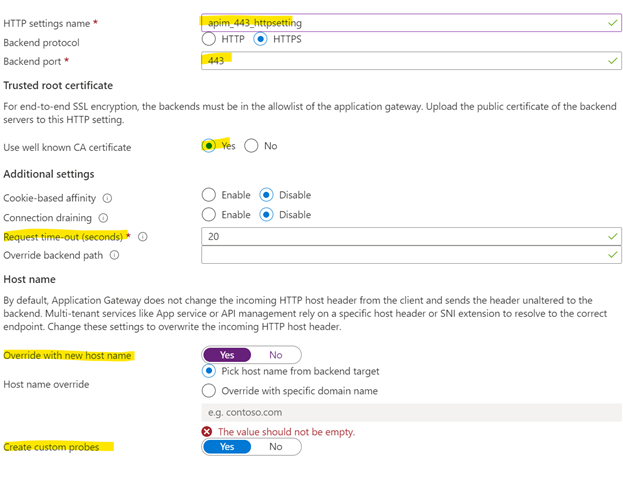
- Http settings name: Just give it a name
- You will probably be using port 443 for your HTTPs setup.
- Trusted Root certificate: If you are using something custom, such as a custom root certificate for a healthcare organization you can select No here and upload the custom root CA. If this is not the case, just select Yes.
- If you need another standard request timeout setting than 20 seconds before timeout, you change it here. I will leave it unchanged. Note that in some services, such as Logic Apps, timeout values can be much higher and this needs to be reflected all the way up here.
- I think you should override the hostname. This is simply a header for the backend. You could potentially use it as an identifier, but there is a better way to implement that.
- Lastly, you want to create custom probes. This is health probes that check if the APIm instance is alive and well.
Path based rule
This is where you set the routing rule presented above. Imagine we have an api that is hosted under api.yourcompany.com/orders/salesorders. We will configure that and also add a “sink” as a catch all, where we send the calls that does not match any API route.
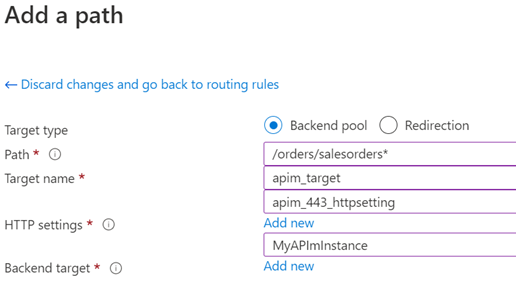
Choose to use a backend pool.
Set the path to your needs for your APIs. The syntax is very simple, just use a * to indicate a “whatever they enter”. In this case I have set it to “orders/salesorders*”. This means that the API above will match the routing rule and it will target the MyAPImInstance backend target using the HTTP settings we defined earlier.
This means that, since we defined an empty “Sink” backend earlier under “Configure backend targets”, that is the default and the sink will be the target unless this routing rule is fulfilled. Then the call will be sent to the APIm instance.
When you are done, click Add to return back to the Routing Rule setting, and the Add again to create the routing rule.
When you are back in the overview page, click Next:Tags to advance.
Tags
Add tags depending on your needs. Perhaps the owning organization, or an environment tag.
Create it
When you are done, click Create, have it validated and then create your AppGw.
Reconfiguring the DNS
The last thing you need to do in this case is to point your api.yourcompany.com to your new AppGw. This is usually done by someone with elevated admin rights and you might need to send out an order. What you need is the IP-address of the AppGw you just created. This can easily be found either during deployment, since it is created first, or you can wait until the creation is done and find it in the overview page.
The person updating your DNS needs to know which CNAME (the name before the domain name in the URL) you want and which IP-number to point that to.
Before you go
You might be thinking that the AppGw can be expensive and particularly if you are using multiple instances of APIm (dev/test/prod). You do not need multiple instances of the AppGw if you use the API-path cleverly.
If you need this: “api-test.yourcompany.com” and “api.yourcompany.com”, you need two instances, as you can only have one Public IP per AppGw.
If you need to save a bit of money you could instead use this pattern: “api.yourcompany.com/test/order/salesorder” for test and “api.yourcompany.com/order/salesorder” for production. The only thing you need are two routing rules, one to point to production and one for pointing to test.
Next steps
In the next post I will be giving you pointers on how to setup the WAF, how to reconfigure the health probe to better for APIm, and also how to secure the communication between the AppGw and the APIm instance.