We got a
very strange error message when calling an on-prem service using the ServiceBus
Relay connected to an Azure Function.
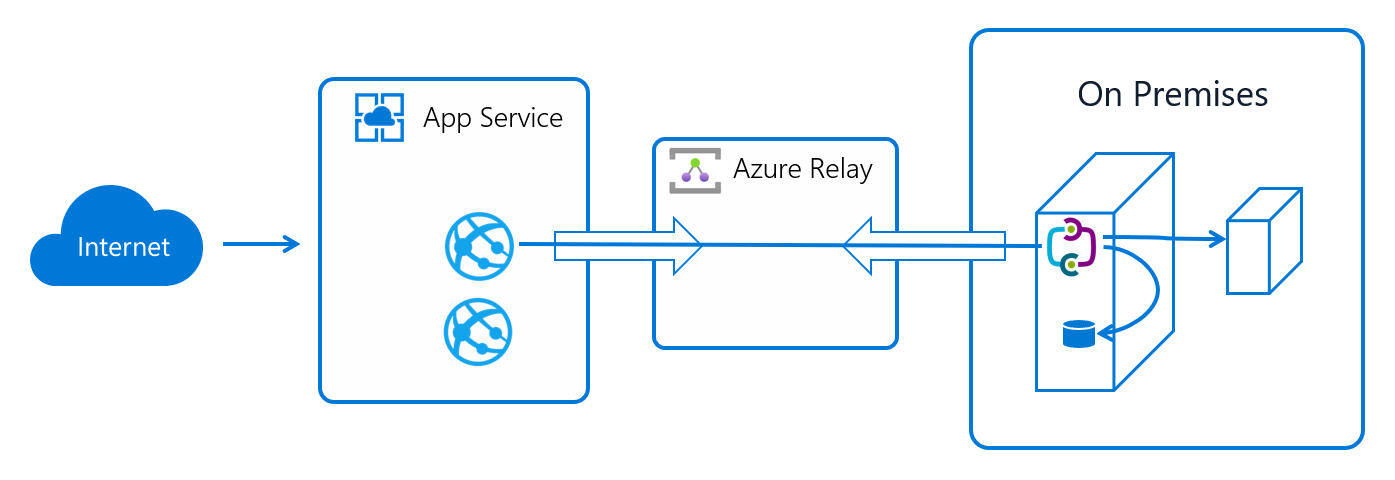
Scenario
The scenario was setup according to the official documentation. The relay can be used as an alternative to the OnPremise Data gateway in scenarios where you don’t need the adapter connectivity. You have a limited subset or can do your own coding if you need something specific.
The error
Executed 'Send' (Failed, Id=GUID_HERE) An attempt was made to access a socket in a way forbidden by its access permissions.
Obviously, there
are some security issues.
The search
One of these
errors makes you visit Mr Google. He turned up a lot of answers, all related to
a local firewall and people having built their own socket services. None of the
answers applied to us.
We tried
regenerating keys and re-registering the connection but that did not work.
The solution
The service
developer had provided us with an IP-address as a host address. When we did a
DNS lookup, we found the name of the server. We simply updated the host address
in the relay connection, and it worked!
The lesson
When using
Azure Relay, don’t use the service IP-address.
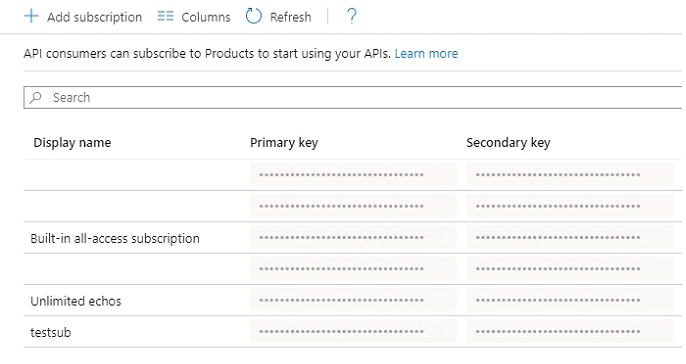
When exposing an API in APIM you typically put it in a Product. You then create a subscription for that product, making it possible for consumers to use your Product, and for you to keep track of that usage.Sometimes, you might need to use a custom key, and not the key assigned by API manager.
Generating keys
You know that you typically do not need to generate keys for a subscription, keys are generated automatically when you create the subscription.
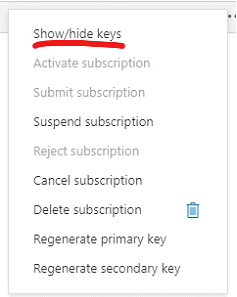
If you choose to, you can view the keys by clicking the three dots at the end of the row.
The key usually looks something like “1f9400c493e4403a807c3002dfc5cbb9”, and if you want to you can regenerate the primary or secondary keys.
What if you needed to set that key instead? There might be reasons for it. For me, I needed to make sure the key had the same value between two environments (don’t ask).
Assigning keys
In order to assign keys, you need to use the APIM Management API (still the worst name since ever), but using that, it is very easy actually.
Enable the Management API
In order how to enable the API and learn how to generate access tokens, visit this page. In the end you should have an access token that looks something like
This can be used as an authentication header in Postman to call the APIs. Note that the access token key will only work if you target the specific management API. More information below.
Another thing to know is that the Management API is not supported for the consumption model of APIm.
Find the right API to use
There are a lot of APIs connected to APIm. The complete list can be found here. The one we are looking for is called Subscription Update.
The subscription update API
one is a little special as it uses the http verb PATCH. This means that only fields sent in the body will be updated. The brother of this verb is PUT that usually wants an entire data object and updates everything, always.
The easiest way to use this is by using the access token generated above. This means that the URI used in the documentation is incorrect. If you want to use that API you need to access it using a Bearer Token. The path pointed out by the documentation is:
https://management.azure.com/subscriptions etc.
The one you need to use (the original access model) is:
I used postman to update the keys. You can actually do this from the API documentation portal, by clicking the “Try it” button in the documentation page and signing in, but I used postman and the original access model. I setup postman using a environment variables and that resulted in this URL:
Test-1 is the ID of the subscription I am trying to assign keys for. After constructing the URL you need to create a body that patches the properties PrimaryKey and SecondaryKey.
Lastly you need to authenticate. Do this by adding an Authorization header and put in the access token you got earlier. All this should result in the following PATCH.
If you got back a 204 No content, that means success!
Go back into the APIm portal and find the subscription and look at the keys. They should now have the value you assigned, however limited and not smart.
Further research
Remember to use long and complex keys. I have not yet examined limits, like what chars are allowed, how long can a key be and so on. Good luck and let me know.
Relating to my other post on Get unix epoch from DateTime in Logic Apps, there is a much simpler way to calculate UtcNow from a Unix timestamp. There is even no real math involved. All you do is make use of the built in function addToTime.
Here is the expression: addToTime('1970-01-01', 1508852960,'second')
So if you receive a JSON body with a tag called UnixTimeStamp, containing the Unix timestamp it will look like addToTime('1970-01-01', int(triggerBody()?['UnixTimeStamp']),'second')
This was posted as a question on the forums a while back. I thought this was a very interesting question as dates, math and the combination of the two intrigues me.
There is a very easy way to achieve this using c# and Azure Functions:
But I wanted to solve it using only Logic Apps functionality or at least see if it was possible.
How to get the value (math)
To make it work we need to use the functionality called ticks. Ticks are part the Windows OS and is a large number that means the number of 100 nanoseconds that has passed since Jan 1st year 0 UTC (western Christian calendar). Unix time is the same but is the number of seconds that has passed since Jan 1st 1970 UTC. These constants in time, and their relation to each other, can be used to calculate the value we need.
One second is 10 000 000 ticks.
TTN is the number of ticks from start until now. TT1970 is the number of ticks that passed from start until 1970. This constant is 621355968000000000.
The calculation looks like (TTN-TT1970) / 10 000 000.
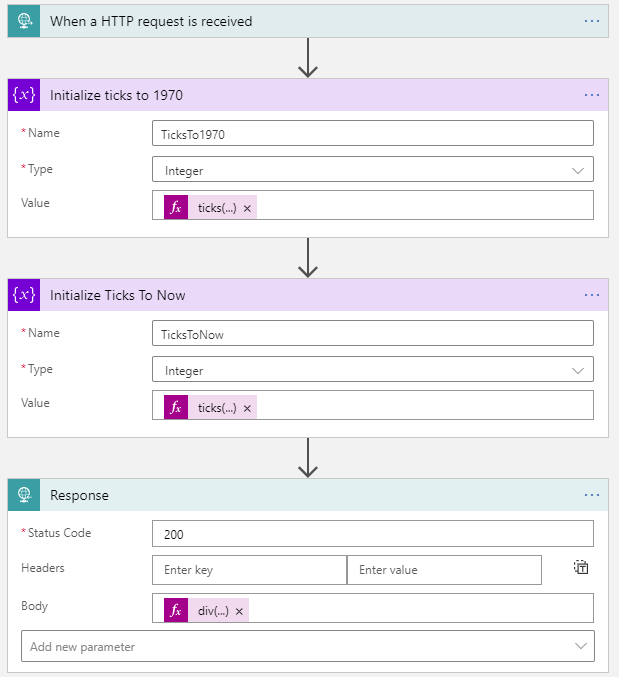
Calculating the Unix value for “Now” (October 24th 2017 13:28) looks like
Set up a new Logic App that can be triggered easily. I usually use a HTTP Request / Response.
You need two variables so create to “Initialize variables”.
Name the first TicksTo1970, set the type to Integer and set the value to ticks('1970-01-01').
Name the second TicksToNow, set the type to Integer and set the value to ticks(utcNow()).
Now you are ready to do the calculation. If you have used a Request / Response, set the Response Body to div(sub(variables('TicksToNow'),variables('TicksTo1970')),10000000)
This is more for me personally, rather than trying to put something new out there. A while back I struggled with getting something simple and basic to work. The reason is that there is usually too much useful information on “options” and “you have to decide”. I took upon myself to document the simplest of authentication flows, when authenticating your call to an Azure service.
Note that not all Azure Services use this way of authenticating. Azure Keyvault does its own thing, and so does Azure Storage.
This article is not a full walkthrough but a condensed walk this way.
In the result, look at the headers and find WWW-Authenticate. In the value for that header there is a GUID, that is the tenant ID. The call can be found in the postman collection I uploaded for this post.
Getting the Client ID
This is a bit hairy as there are several steps to do this and some concepts you need to understand. The short version is this: You create a “client” in Azure. This “client” is an identity (much like a regular user). The old “service user” might be a good way of describing it. In the end you will have a GUID. That is the client ID. The best instructions on how to create a client in Azure can be found here.
Getting the Client Secret
This is just bit a further down the page on how to create a client. Make sure you save the key (secret) properly.
Full information
If you need more information on how to authenticate an API call, a very good place to start is on the Azure Rest API reference page.