Using the AppGw in front of APIm – part 2

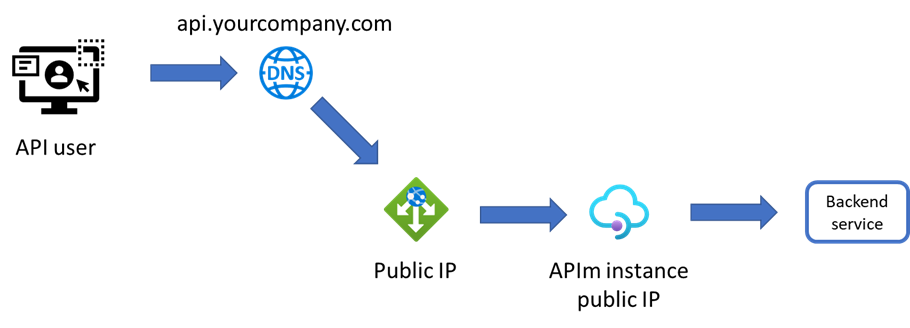
This is the sequel to my previous post Using AppGw in front of APIm, in which I showed how to setup an Application Gateway (AppGw) in-front of an APIm instance.

In this post I will show how you should (could) configure a health probe, configure the firewall and lastly how to secure your APIm to only accept calls that has been routed thru your AppGw.

Configuring a health probe

Why do you need this? A health probe is used by the AppGw to see which services in a backend pool is healthy. If you do not have more than one instance in a backend pool, perhaps you do not need this feature. If you have multiple instances, the AppGw will only send requests to the healthy instances. This is basic load balancing.

To configure a healthprobe for APIm you can use the “status” service that is available in all APIm instances. You can test it by sending a GET to https://{yourAPIminstanceFQDN}/status-0123456789abcdef. If you receive 200 Service Operational, then you know the service is healthy.

We can use this call to get the APIm status in our health probe.

Setting it up

Start by clicking “Health probes” in the left menu.

The find and click + Add at the top of the new blade.

Set the values for the health probe like this:

  • Name: The name of the probe.
  • Protocol: HTTPs (you do not use HTTP)
  • Host: The FQDN of your APIm instance, usually servicename.azure-api.net.
  • Pick hostname from the HTTP settings: I use NO, you could use YES if you know what you are doing.
  • Pick port from the HTTP settings: I use YES, because I know that the port is set there.
  • Path: Set to /status-0123456789abcdef

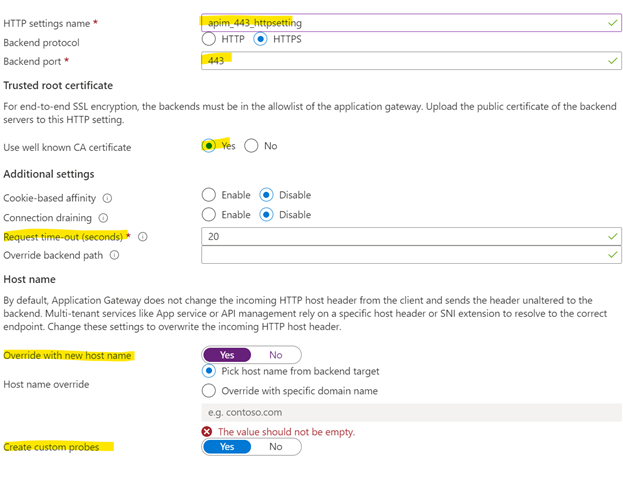
Leave the rest as is but make sure you select your HTTP setting you created in the previous post.

End the configuration by testing it. Click Test.

It tests the setting:

And hopefully, it works.

The firewall

This is so easy; it might not even need to be documented.

If you configured the firewall according to the steps in part one, you are already protected but I will go thru the different settings and provide some experience.

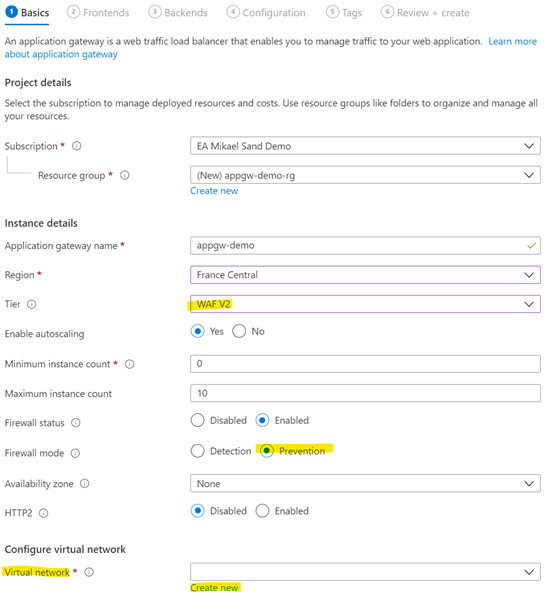
This is the basic configuration:

Basic stuff

Tier should be set to WAF V2. The standard is cheaper but does not contain the WAF.

Firewall status: should be enabled but you could disable it in DEV to know if a caller is locked out because of the firewall or not.

Firewall mode: should be set to Prevention. You do want to keep the bad people out, to prevent them. The other setting will just log a bad person.

Exclusions

This is where you configure the WAF to not block calls based on “strange data”. The firewall scans the incoming request for “strange data” or junk-data if you will. A long string of letters, such as an auth-header of a cookie can be considered strange, and the firewall will reject it. You might, therefore, exclude some settings.

The official documentation gives some examples. I always add: Request Header Name, Starts with, Auth to eliminate any authorization issues.

Global parameters

Note that these settings are global. All incoming calls will be scanned using these settings.

Inspect request body: If you turn this on the WAF will automatically scan incoming requests for strange data. For instance, if the incoming request is marked as Content-Type: application/json, the WAF will validate the JSON and reject it if the JSON is malformatted.

Max request body size: Here is a big limitation of the WAF. If you turn on inspection, you cannot accept calls bigger than 128 kb. I recently had a project where the caller wanted to send files in excess of 20 mb as request bodies. We had to device a workaround to keep the WAF inspection turned on for everything else. The settings are global.

File upload limit: If you can get your caller to send the messages as file uploads instead of request bodies, the upper limit is 100 mb.

Rules

Click the Rules tab at the top of the blade.

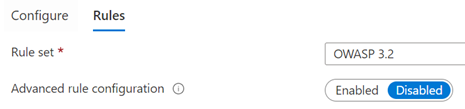
The basic setting is to use the max version of OWASP to be protected from the bad people. For more information on OWASP visit their website.

You can leave the Advanced rule configuration as disabled for now. This feature is useful if your callers are expressing issues and you need to disable a certain rule to allow the calls. Just find the affected rule and uncheck it.

Please be aware that: these settings are global and limits your security baseline. Try to update the caller instead.

Secure your APIm

The WAF has its own IP address, and you can use that for IP-whitelisting. You can also have the AppGw set a custom header and have APIm look for that header. This method will not be used here but look under “Rewrites” in the left menu.

Find the IP address

To find the IP address of your AppGw, look under Overview and to the right you will find the Frontend Public IP address:

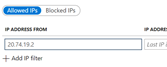
In my case it is 20.74.19.2.

Update APIm global policy

Switch to your APIm instance and select APIs in the left menu. Then select All APIs (this is the global policy). Lastly select Add Policy under Inbound processing.

Choose Filter IP addresses and in the new page, choose Add IP filter.

Since we will not be using a range of IP addresses, just fill in the first box with the IP address of your AppGw.

This will only allow calls from that IP address. The policy file will look like this:

<inbound>
<ip-filter action=”allow”>
<address>20.74.19.2</address>
</ip-filter>
</inbound>


If someone calls your APIm directly they will get an error message. Here is an example:

Conclusions

There are other useful features for you to explore. For instance, you can hook up the AppGw to a Log Analytics instance and look at the data being logged. This is very useful if your callers report errors due to rules or message inspection. You can also use it to show that the firewall stops incoming malicious calls.

I have found this service a useful and welcome addition to APIm in Azure, and I encourage you to try it out in your API platform.

Using AppGw in front of APIm

Everyone knows that the internet is a scary place, and we also know that our APIm instance resides on it, then again, we know that, despite the obvious lack of a firewall, it still works just fine. So why should you add a firewall in front of your APIm instance?

The answer is simple: Added security and features, all provided by the Azure Application Gateway, or AppGw.

Let me go thru some of the main points of this architecture, then I will show you how to implement it.

Network vs service based?

This post is meant for a scenario in which the APIm instance is not network based. You can use this together with the standard edition, and still make the network huggers happy because you can use things like IP-whitelisting. If you are using the premium version of APIm you should set it up according to some other architectural walkthrough.

The AppGW needs a network, you just do not implement it if you do not want to.

The Azure Front door

Let us get this out of the way early. The Azure Front Door, or AFD, is a very useful router and firewall. It is a global service, and it is easy to use. Why not put that in front of your APIm instance?

According to this very handy flowchart. The AFD is meant to be a load balancer in front of several instances. The AppGw has some routing but if you have multiple instances of APIm, I really think you should be using the APIm premium offering instead. The AppGw is more of a router, and not so much a load balancer.

Overview

The communication overview of the setup looks something like this:

  • The API user calls your API at api.yourcompany.com/orders/salesorder send a salesorder.
  • The call is routed to the local DNS that hosts the yourcompany.com domain. In that DNS, there is a CNAME that points to the public IP address of the AppGw.
  • The gateway receives the call and routes it to the APIm instance’s public IP address.
  • Now the call can be sent anywhere the APIm instance has access to. Perhaps an external SaaS or an internal resource via a firewall or something else.

AppGw is a great product for placing at the very edge of your internet connected services. Here are some good reasons.

The WAF

The Web Application Firewall, or WAF, is a firewall designed to handled API, or webcalls. Besides mere routing you can also configure it to look at messages, and headers so that they confirm with what is expected. One example is that it can see if the payload is valid JSON if the header content-type is set to application/json.

But the best thing is its support of rules based on the recommendations from OWASP. This organization looks at threats facing the internet and APIs, such as SQL injection or XML External Entities. Its Top 10 Security Risks is a very good place to start learning about what is out there. The only thing you need to do is to select OWASP protection from a dropdown and you are good to go. Security as a Service at its finest.

Sink routing

One popular way of setting up any kind of routing is to default all calls to a “sink”, i.e. the void, as in no answer, unless some rule is fulfilled. One such rule is a routing rule. This rule will only allow paths that confirm to specific patterns and any other sniffer attempt by any kind of crawler is met with a 502.

A rule that corresponds to the example above might be /orders/salesorder*. This allows all calls to salesorder but nothing else, not even /orders/.

Logging

I will not go that much into any detail here, but you can get access to everything that is sent thru the WAF. Each call ends up in a log which is accessible using Log Analytics and as such you can do a lot of great things with that data.

Setting it up

There are many cool things you can do. I will show you how to setup the most basic of AppGw.

The start

You need to complete the basic settings first. Here is how I setup mine.

Make sure that you select the right region, then make sure you select WAF V2. The other SKUs is either old or does not contain a firewall, and we want the firewall.

Next, enable autoscaling. Your needs might differ but do let this automated feature help you achieve a good SLA. It would be bad if the AppGw could not take the heat of a sudden load increase if all other systems are meant to.

Firewall mode should be set to prevention. It is better to deny a faulty call and log it, instead of letting it thru and logging it.

Network is a special part of the setup, so it needs its own heading.

Network

You need to connect the AppGw to a network and a Public IP, but you do not need to use the functionalities of the network.

Configure a virtual network that has a number of IP-addresses. This is how I set it up:

Now you are ready to click Next:Frontends at the bottom.

Frontends

This is the endpoints that the AppGw will use to be callable. If you need an internal IP address you can configure that here.

I have simply added a new Public IP and given it a name. For clarity, the picture contains settings for a private IP but that is not needed of you only need to put it in front of APIm.

Click Next:Backends at the bottom.

Backends

It is time to add the backend pools. This can be multiple instances of APIm or another service that will be addressed in a “round robin pattern”, so load balancing yes, but in a very democratic way. Therefore, you should not really use it for those scenarios described earlier.

Just give it a name and add the APIm instance using its FQDN.

When you are done, click Next:Configuration.

Configuration

This is … tricky and filled with details. Be sure to read the instructions well and take it easy. You will get thru it.

Add a listener

  • Start by adding a routing rule. Give it a name. I will call mine apim_443.
  • Next you need to add a Listener. Give it a good descriptive name. I will call mine apim_443_listener.
  • Choose the frontend IP to be Public and choose HTTPs (you
    do not ever run APIs without TLS!)

This is the result

Note that there are several ways to add the certificate. The best way is to use a KeyVault reference.

Configure backend targets

Next, you shift to the Backend targets tab.

The target type is Backend Pool. Create a new backend target and call it Sink. More on this later.

Next you need to configure the HTTP Setting. I know it is getting tricky but this is as bad as it gets. Click the Add New under HTTP Setting

HTTP setting

  • Http settings name: Just give it a name
  • You will probably be using port 443 for your HTTPs setup.
  • Trusted Root certificate: If you are using something custom, such as a custom root certificate for a healthcare organization you can select No here and upload the custom root CA. If this is not the case, just select Yes.
  • If you need another standard request timeout setting than 20 seconds before timeout, you change it here. I will leave it unchanged. Note that in some services, such as Logic Apps, timeout values can be much higher and this needs to be reflected all the way up here.
  • I think you should override the hostname. This is simply a header for the backend. You could potentially use it as an identifier, but there is a better way to implement that.
  • Lastly, you want to create custom probes. This is health probes that check if the APIm instance is alive and well.

Path based rule

This is where you set the routing rule presented above. Imagine we have an api that is hosted under api.yourcompany.com/orders/salesorders. We will configure that and also add a “sink” as a catch all, where we send the calls that does not match any API route.

Choose to use a backend pool.

Set the path to your needs for your APIs. The syntax is very simple, just use a * to indicate a “whatever they enter”. In this case I have set it to “orders/salesorders*”. This means that the API above will match the routing rule and it will target the MyAPImInstance backend target using the HTTP settings we defined earlier.

This means that, since we defined an empty “Sink” backend earlier under “Configure backend targets”, that is the default and the sink will be the target unless this routing rule is fulfilled. Then the call will be sent to the APIm instance.

When you are done, click Add to return back to the Routing Rule setting, and the Add again to create the routing rule.

When you are back in the overview page, click Next:Tags to advance.

Tags

Add tags depending on your needs. Perhaps the owning organization, or an environment tag.

Create it

When you are done, click Create, have it validated and then create your AppGw.

Reconfiguring the DNS

The last thing you need to do in this case is to point your api.yourcompany.com to your new AppGw. This is usually done by someone with elevated admin rights and you might need to send out an order. What you need is the IP-address of the AppGw you just created. This can easily be found either during deployment, since it is created first, or you can wait until the creation is done and find it in the overview page.

The person updating your DNS needs to know which CNAME (the name before the domain name in the URL) you want and which IP-number to point that to.

Before you go

You might be thinking that the AppGw can be expensive and particularly if you are using multiple instances of APIm (dev/test/prod). You do not need multiple instances of the AppGw if you use the API-path cleverly.

If you need this: “api-test.yourcompany.com” and “api.yourcompany.com”, you need two instances, as you can only have one Public IP per AppGw.

If you need to save a bit of money you could instead use this pattern: “api.yourcompany.com/test/order/salesorder” for test and “api.yourcompany.com/order/salesorder” for production. The only thing you need are two routing rules, one to point to production and one for pointing to test.

Next steps

In the next post I will be giving you pointers on how to setup the WAF, how to reconfigure the health probe to better for APIm, and also how to secure the communication between the AppGw and the APIm instance.


Documentation tools for VS Code

So, you are at the end of a project or task, and you need to document the thing that you did. I recently did enough documentation to change my title from Solution Architect to Author. Here are my tips and tricks for making a documentation experience better when using VS Code.

Markdown

Of course, you need to document in markdown, and you commit the markdown files as close to the reader as possible. If you need to document how a developer should use an API or some common framework, the documentation should be right next to the code, not in a centralized docs hub!

When I use markdown, I always keep this cheat sheet close. This is because I can never remember all the cool and nice things you can use markdown for.

VS Code and markdown

Multiple screen support

The support for markdown in VS code using extensions is great but there is one trick you need to know if you have two screens. Using this trick, you can have the markdown on one screen and the preview on the other.

  1. Open VS Code and your markdown file.
  2. Use the shortcut Ctrl+K and the press O (not zero, the letter O).
  3. This opens a new instance of VS code with your workspace open.
  4. Turn on the Preview in the new window. You can use Ctrl+Shift+V

Now, you can have the preview on one screen and the markdown on another. Every time you update and save the markdown, the preview will be updated.

Extension 1: Markdown all in one

Serious markdown tool to help you with more than just bold and italics. It has shortcut support for those two, but you can even create a table of content (ToC) and index your headings, aka use section numbers. It has millions of downloads and can be found here: GitHub – yzhang-gh/vscode-markdown: Markdown All in One

Extensions 2: File Tree Generator

Every time you document code you seem to end up presenting folder structures, and the refer to them. Using this you can easily create nice looking folder trees, copy and paste them between markdown documents.

Further

There are other, cool features and extensions in markdown. The important thing is to know if the platform you are uploading to can support, or render, the result.

One such thing is mermaid. Which can render diagrams based on text. This makes it super duper easy to document message flows, Gantt-schemas or even Git-branches.

How I deploy keyvault values

Introduction

There seems to be a lot of ways that we deploy the actual secret values into a key vault. The problem basically boils down to that someone at some point needs to view the password, in clear text when it is entered into whichever solution you have chosen.

I have seen solutions with blob storage hosting files with the actual values. I have also seen “master key vaults”, in which a secret is created and then picked up by a deployment and put into a local key vault.

I have seen solutions using Terraform and custom PS-scripts. All of these have the same common problem: They simply just move the problem one step over, and to me scripting is a way to solve something that is unsolvable without scripts.

My simple solution

I am a simple guy; I like simple solutions. I also had some other restraints: Azure DevOps and ARM. I do not like the idea of a centralized key vault and local copies. They still need to be updated manually, by someone at some point and then everything needs to be re-run anyway.

My solution makes use of secret-type variables in Azure DevOps. The person that creates the deploy pipeline enters the value or makes room for it to be updated by someone at some point. The variable is then used to override the parameter value in the deployment.

The step in the pipeline can either be part of a specific deployment or stored in a separate release-pipeline that only certain people have access to.

The solution step by step

To make this work you need to walk thru these steps:

  1. Create the ARM-template and parameter file.
  2. Create a DevOps build.
  3. Create the DevOps release pipeline.
  4. Run the pipeline and verify the results.

I will assume that you have a repo that DevOps has access to, that you are using VS Code and know how to create pipelines in DevOps.

Create the ARM-template and parameter file

If you have not installed the extension Azure Resource Manager (ARM) Tools, now is a great time to do so.

The examples below are just for one value. If you need to add more, simply copy, paste and rename.

The templatefile

{
    "$schema": "https://schema.management.azure.com/schemas/2019-04-01/deploymentTemplate.json#",
    "contentVersion": "1.0.0.0",
    "parameters": {
        "keyVaultName": {
            "type": "string",
            "metadata": {
                "description": "Your keyvault name "
            }
        },
        "secretName": {
            "type": "string",
            "metadata": {
                "description": "The name to give your secret "
            }
        },
        "secretValue": {
            "type": "securestring",
            "metadata": {
                "description": "The value of the secret"
            }
        }
    },
    
    "resources": [
        {
            "name": "[concat(parameters('keyVaultName'), '/', parameters('secretName'))]",
            "type": "Microsoft.KeyVault/vaults/secrets",
            "apiVersion": "2019-09-01",
            "tags": {},
            "properties": {
                "value": "[parameters('secretValue')]",
                "contentType": "secret",
                "attributes": {
                    "enabled": true
                }
            }
        }

    ],
    "outputs": {}
}

There is really nothing special except for one crucial
part: You need to make the value of the secret be a securestring type. If not, the value will be accessible from deployment logs.

If you are interested in more information, you can find the ARM template definition for adding a key vault secret here.

The parameterfile

{
    "$schema": "https://schema.management.azure.com/schemas/2019-04-01/deploymentParameters.json#",
    "contentVersion": "1.0.0.0",
    "parameters": {
        "secretName": {
            "value": "myARMCreatedSecret" 
        },
        "keyVaultName": {
            "value": "myKeyVaultName" 
        },
        "secretValue": {
            "value": "overridden"
        }
    }
}

There is only one noteworthy thing in the parameter-file: the secretValue is set to overridden. It does not have to be, but since the value will be overridden from Azure DevOps deployment, I added this value as some form of documentation. You can set it to whatever you like, even an empty string.

Create a DevOps build

After checking in the code, create a build for your key vault updates. If you don’t know how, I suggest you read up on it elsewhere. There is even an MS Learn course if you prefer.

Make sure that the ARM-template and parameter file are published at the end of the build.

Create a devops release pipeline

I will not go thru the basics of this step either, just the parts that are important to remember.

Create secret variables

Start by adding some variables that will hold the values for your secret.

Go to variables and click Add.

Add a variable called mySecret. Then add the value.

Initially, the secret is in clear view. Simply click the little padlock, to turn it into a secret value.

Now, save your updated pipeline. If you click the padlock again (after save), the secret will be gone. This means that the secret is safe and secure in the pipeline, when using variables.

Use the secret value

In your pipeline, you will add a ARM template deployment Task and set everything like usual, such as your Resource Manager Connection and such. Point to your new template and parameter files.

Given the examples above the should be set to:

  • Template: $(System.DefaultWorkingDirectory)/_Build/drop/keyvault/templatefile.json
  • Template Parameters: $(System.DefaultWorkingDirectory)/_Build/drop/keyvault/templatefile.parameters.TEST.json
  • Override Template Parameters: -secretValue “$(mySecret)”

The last one is the important one. This tells Azure DevOps to override the parameter called “secretValue” with the value in the DevOps variable “mySecret”.

Run the pipeline and verify the results

After you have run the pipeline to deploy the secret, simply look in the key vault you are updating and verify the result.

Note that the ARM will create the secret and add the value the first time, all the next runs will add a new version of the secret value. Even if the value is the same.

Here is the secret created by my DevOps Pipeline:

Here is the secret value set by the DevOps Pipeline:

Conclusion

I know there are other ways of deploying the secret and its value. I just like the simplicity of this approach and the fact that there is one truth: The value in the DevOps Pipeline. If you need to update the value in the key vault, any key vault, you update the Pipeline variable and create a new release.

The built-in release management of pipelines also guarantees that you get traceability. Who updated the value? When? When was it deployed and by who?

A frustrating error using the HTTP with Azure AD connector

The response is not in a JSON format

Have you been using the HTTP with Azure AD connector lately? It´s really a game-changer for me. No more custom connector is needed, unless you want to. I wrote a whole how-to post about it.

The problem

I was using the connector to access an on-prem web service, "in the blind". I had some information about the message that should be sent but was not sure. I was trying out different messages when I got this strange error back:

{
    "code": 400,
    "source": <your logic app's home>,
    "clientRequest": <GUID>,
    "message": "The response is not in a JSON format",
    "innerError": "Bad request"
}

Honestly, I misinterpreted this message and therein lies the problem.
I was furious! Why did the connector interpret the response as JSON? I knew it was XML, I even sent the Accept:text/xml header. Why did the connector suppress the error-information I needed?

The search

After trying some variants on the request body all of a sudden I got this error message:

{
    "code": 500,
    "message": "{\r\n  \"error\": {\r\n    \"code\": 500,\r\n    \"source\": \<your logic app's home>\",\r\n    \"clientRequestId\": \"<GUID>\",\r\n    \"message\": \"The response is not in a JSON format.\",\r\n    \"innerError\": \"<?xml version=\\\"1.0\\\" encoding=\\\"utf-8\\\"?><soap:Envelope xmlns:soap=\\\"http://schemas.xmlsoap.org/soap/envelope/\\\" xmlns:xsi=\\\"http://www.w3.org/2001/XMLSchema-instance\\\" xmlns:xsd=\\\"http://www.w3.org/2001/XMLSchema\\\"><soap:Body><soap:Fault><faultcode>soap:Server</faultcode><faultstring>Server was unable to process request. ---> Data at the root level is invalid. Line 1, position 1.</faultstring><detail /></soap:Fault></soap:Body></soap:Envelope>\"\r\n  }\r\n}"
}

And now I was even more furious! The connector was inconsistent! The worst kind of error!!!

The support

I my world, I had found a bug and needed to know what was happening. There was really only one solution: Microsoft support.
Together we found the solution but I still would like to point out that error message that got me off track.

The solution

First off! The connector did not have a bug, nor is it inconsistent; it is just trying to parse and empty response as a JSON body.
Take a look back at the error messages. They are not only different in message text, but in error code. The first one was a 400 and the other a 500. The connector always tries to parse the response message as JSON.

Error 500: In the second case (500) it found the response body, and supplied the XML as an inner exception. Not the greatest solution, but it works.
Error 400 In the first error message the service responded back with a Bad request and an empty body. This pattern was normal back when we built Web Services. Nowadays, you expect a message back, saying what is wrong. In this case, the connector just assumed that the body was JSON, failed to parse it and presented it as such.

If we take a look at the message again perhaps it should read:

{
    "code": 400,
    "source": <your logic app's home>,
    "clientRequest": <GUID>,
    "message": "The response-message was emtpy",
    "innerError": "Bad request"
}

Or The body length was 0 bytes Or The body contained no data

Wrapping up

Do not get caught staring at error messages. You can easily follow down the trap of assumptions. Verify your theory, try to gather more data, update your On-Premise Data Gateway to the latest version, and if you can: try the call from within the network, just like old times.