Logging in to Azure as yourself, but from Postman

A simple self-reminding how to

First of all, thank you to @ToonVanhoutte for writing the original post on how to get the bearer token using Fiddler (super sneaky!) and also to @splaxi (Mötz Jensen) who provided the PowerShell solution.

What are you trying to do?

Hopefully you found this post while googling “logging into azure as a user from postman” or “postman azure as user”. Most posts (including my own) are about how to access Azure APIs from Postman using an App Registration.

Sometimes that is not an option, and your account might actually have enough access-rights to get the information you want. The problem is that sometimes, the portal is not up to the task.

Using Postman to log into Azure as yourself

Rumor has it that it is possible to do this, using just postman but I was not able to, but a simple PowerShell script does the trick.

If you run the following script, you will log in and copy the bearer token to the clipboard. Then you paste it into the token textbox in Postman and you are good for about an hour untill your token has expired.

The powershell script

# Install-Module Az.Accounts

# Login as a user
Connect-AzAccount

# Get the token, and store it in the clipboard.
Get-AzAccessToken | Select-Object -ExpandProperty Token | Set-Clipboard

Note that you need to install the Az.Accounts module for this to work.

When you run this script you will get the old Login Window(tm), you login and when the script is done, the bearer is in the clipboard.

Postman

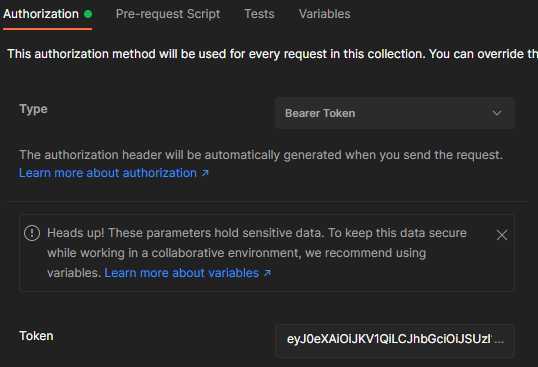
Return to Postman and find the Authorization tab. Select Bearer Token and paste the copied token into the textbox. That is it.

Failing APIm export and breaking in thru the backdoor

A strange experience and a bug

You can read this post in two ways, either get the full story or scroll down to the solution. My guess is that you found this post because you searched for this error message:

"Definitions/body parameters are not exported since this API references multiple schemas with OpenAPI components as opposed to one. Schemas referenced: [number],[another number]"

And you have spent some time being frustrated because removing the whole API and starting over did not work.

Backstory

This is not only filler, but it also describes how the error occured. Perhaps you recognize yourself in this.

The error from my point of view

I had developed an API for a colleague. The API had a demand for using Definitions of both requests and responses. Honestly, we as API developers, do not use that as much as we should. The colleague supplied me with examples and I got to working using the portal interface to enter definitions.

Things started going south when the portal stopped responding, but after a refresh everything seemed ok. I added all the definitions and then connected them to operations within the API. When I was done I exported the API as OpenAPI v2 (compatability reasons). This is when the error occured.

Looking at the OpenAPI file I could see that all my operations was missing their content properties, meaning that all definitions I had put in, had been omitted. Scrolling down in the OpenAPI file I found the error above.

Redeploy will not solve it

I deleted the entire API and started over, but the same thing happened again! How could APIm remeber “schemas” from an API that I had deleted? Time to get creative and provide the solution.

The solution – short version

You need to delete the “schemas” and you cannot do that from the portal, you need to access your APIm instance using the RestAPI. Find the offending schema using Api Schema – List By Api and the delete it using Api Schema – Delete

The solution – how to version

I will try to explain every aspect of this operation, to make you feel confident about deleting things from your APIm instance.

Schemas?

Looking back at the error message, it mentions schemas, which might seem strange as APIm never seem to use schemas but rather definitions. The reason is simple: OpenAPI uses schemas and a collection of definition is a schema. APIm usually puts all your defintions into one single schema. The problem was that something went wrong and my API had multiple schemas which messed up the export.

Since the schema property is never surfaced in APIm you cannot delete them. Even if I deleted the entire API, the schema was retained and since you cannot delete it (you can only delete all values/definitions within a schema) I was stuck.

The APIm Rest API?

One of the most confusing things is that there is an API to manage your Azure API management. A manager’s manager if you will. This is really well documented an you can find the basics on how to activate and access it here.

You need to activate the API via the portal and also generate an accesskey in order to execute any APIs. You can use Azure OAuth if you want to but I find it easy to just generate a key and supply it using an Authentication header. I use this in all my calls.

Using the APIm Rest API

This API can be used for all sorts of operations on your APIm instance and I encourage you to explore it further. For now you need to execute two calls: one to find the extra schema(s), and one to delete.

There is one important exception to the documentation, and that is the API base-address. If you want to use the easy, key-based, authentication you need to update the address given in the documentation. Lets look at the first API, Api Schema – ListByApi. The documentation gives the following address:

https://management.azure.com/... etc

You must use the direct API path:

https://serviceinstancename.management.azure-api.net.management.azure-api.net/... etc

If you use the first one, you will get an authentication error.

Find the extra schemas

The schema identifiers are given in the error message, but you need to know which one is the wrong one. Therefore you need to list the schemas for your API. Issue this call:

GET https://serviceinstancename.management.azure-api.net/subscriptions/[subscriptionID]/resourceGroups/[resourcegroupname]/providers/Microsoft.ApiManagement/service/[serviceinstancename]/apis/[ApiID]?api-version=2020-06-01-preview

If you use Postman you can easily handle the path variables by using this:

GET https://{{api-servicename}}.management.azure-api.net/subscriptions/:subscriptionID/resourceGroups/:resourceGroupName/providers/Microsoft.ApiManagement/service/:serviceName/apis/:apiId/schemas?api-version=2020-06-01-preview?api-version=2020-06-01-preview

The API-ID can be found on the Settings-page for the API, but there it is called Name and is located below Display Name.

The response contains the schemas, in an array and a count property at the end. If this property is > 1, you have too many schemas.

Find the schema ID

The schema object is defined with four base properties, id, type, name and properties. Confusingly the ID you are looking for is located in name. The ID is a string of numbers and sometimes also letters, but it is not a GUID.

As to finding which schema you need to delete? I cannot tell you. It depends on your data model. In my case it was easy.

Deleting the schema

To be extra sure that you will be deleting the correct schema; find the schema first. Issue this call:

GET https://serviceinstancename.management.azure-api.net/subscriptions/[subscriptionID]/resourceGroups/[resourcegroupname]/providers/Microsoft.ApiManagement/service/[serviceinstancename]/apis/[ApiID]/schemas/[SchemaID]?api-version=2020-06-01-preview

The schema ID is the one you got from the call above.

Here is a Postman call for you:

GET https://{{api-servicename-neu}}.management.azure-api.net/subscriptions/:subscriptionId/resourceGroups/:resourceGroup/providers/Microsoft.ApiManagement/service/:serviceName/apis/:apiId/schemas/:schemaId?api-version=2020-06-01-preview

If you get back the schema you want to delete, you simply issue the same call again, just change the VERB from GET to DELETE.

Conclusion

I have NO IDEA how the problem happened to begin with, and I do not like that schemas cannot be deleted from the portal, but is is easy to do using the API Management REST.

Deploying secure communication with APIm and Functions using Managed Identity

Yes I know, not the snappiest title.
In my previous post Secure communication with APIm and Functions using Managed Identity, I showed how easy it is to setup OAUTH-based authentication in front of your Azure Functions, and how to configure an APIm policy to call that function, thereby uping the security level of your Azure Function communication.

CI/CD using ARM

I like ARM and after some serious digging I found the ARM template definition for how to secure your Azure Function. I prefer to use version V2, but you should look at V1 as well, as it has better documentation.

You can find the V2 template definition here, and here is V1.

When you deploy your function app you are using CI/CD and ARM. In order to add the functionality of the authourization setting you need to add a resourse called Microsoft.Web/sites/config and set its name to yourfunctionappname/authsettingsV2. You can either add this to your existing ARM-template or as a separate template. If you add it to your existing ARM template, do not forget to add the dependsOn property.

Minimal ARM Template

Here is my ARM-template that will deploy the settings addressed in the other post.

{
    "$schema": "https://schema.management.azure.com/schemas/2019-04-01/deploymentTemplate.json#",
    "contentVersion": "1.0.0.0",
    "parameters": {
      "appClientId": {
        "type": "string",
        "metadata": {
          "description": "The Client ID of the AppReg that the function is a part of."
        }
      },
      "sites_function_name": {
        "type": "string",
        "metadata": {
          "description": "The function app name"
        }
      },
      "tenantID": {
        "type": "string",
        "metadata": {
          "description": "The ID of the tenant providing auth token"
        }
      }
    },
    "resources": [
      {
        "name": "[concat(parameters('sites_function_name'), '/authsettingsV2')]",
        "type": "Microsoft.Web/sites/config",
        "apiVersion": "2020-12-01",
        "properties": {
          "platform": {
            "enabled": true
          },
          "globalValidation": {
            "requireAuthentication": true,
            "unauthenticatedClientAction": "Return401"
          },
          "identityProviders": {
            "azureActiveDirectory": {
              "enabled": true,
              "registration": {
                "openIdIssuer": "[concat('https://sts.windows.net/',parameters('tenantID'),'/')]",
                "clientId": "[parameters('appClientId')]"
              }
            },
            "isAutoProvisioned": false
          },
          "login": {
            "tokenStore": {
              "enabled": true
            }
          },
          "httpSettings": {
            "requireHttps": true
          }
        }
      }
    ],
    "outputs": {}
  }

I will go thru some of the properties
properties/platform/enabled This basically enables the setting. You can switch this between true or false if you, for instance, have different rules for TEST and PROD. Simply turn it off for TEST and enable it for PROD.
globalValidation/requireAuthentication Should be set to true but in some cases you might want to be able to handle unauthorized calls as well.
globalValidation/unauthenticatedClientAction Set this to Return401 if the function should be called as APIs. For other scenarios, consult the documentation.
identityProviders/azureActiveDirectory This object contains all the settings needed for the AAD type authentication.
identityProviders/azureActiveDirectory/registration/openIdIssuer This points to your tenant using its GUID. If you do not know your tenant GUID you can visit whatismytenantid.com. This setting makes sure that the authenticating token is issued by your Azure tenant.
identityProviders/azureActiveDirectory/registration/clientId This is the ID of Application Registration that was created when you setup the function authentication. If this is the first run, create an application registration first and use it with this function. I made an easy walkthru post a while back.
properties/httpSettings/requireHttps always require HTTPs.

Additional settings

Consider reading the documentation for additional settings. There are a lot of properties relating to other authentication providers, but also some settings relating to authentication and AAD that you might find useful .
jwtClaimChecks/allowedGroups If you are using claims and groups/roles, you can make sure that the caller has the right credentials (I have not validated this functionality with APIm)
allowedClientApplications Stop callers that are not APIm simply by adding the clientID of your APIm (I think, I have not tried this)
allowedAudiences Might be useful to add other clients as audiences as well. The connected Application Registration ID (the clientID in the ARM-template) is always allowed, even if it is not added as allowed.

Next step

You should now add your version of the ARM template to your CI/CD process, and let me know how it works out for you. You can find me on Twitter.

Secure communication with APIm and Functions using Managed Identity.

Using manage service identity is an easy to configure, out of the box, functionality that ups your level of security within your organization.


Having an Azure Function exposed using Azure API management is very easy. So easy in fact that I will not address it here, but here is a good source if you need to know it, and here is a very basic one. In some cases, the level of security given by the Function’s out of the box functionality is too low. Just having a “code” to protect the function is not enough in my opinion. Especially since it is so easy to set this up. This post provides a walkthrough for using built-in functionality for Managed Service Identity (or MSI for short). As always, I try to show this in a simple, just make it work, way.

What is an MSI?

But I still need to explain the basics of an MSI. You want a service or a process to have an account, a way of showing its “identity” and you want that identity to be protected, but you do not want to handle (and send) passwords everywhere. This is where the Managed Service Identity comes into play. It is connected to the Azure AD, but the actual authentication is handled by Azure. You never need to send credentials. The authentication, and authenticity of the service is handled by Azure AD.

Looking at the concrete stuff, the MSI is an Enterprise Application in your AAD, viable only for that service instance.

Using MSI for other integration services

This “built-in” functionality means that you can use this way of securing not only functions but Logic Apps and Azure Service Bus as well. The service bus even allows you to combine it with RBAC.
Here is some documentation for securing Logic Apps in (almost) the same way, and here is a great post on how to setup MSI for Azure Service Bus.

What we need to make it work

  1. Your APIm instance must have a “Managed Identity” configured.
  2. Your function must have “Authentication” configured.
  3. The APIm has an updated policy.
  4. A successful test.

1: The APIm MSI

You can set that up using this documentation. Note that the screen capture in that post is a bit dated, but all the names are the same. I suggest you use System Assigned as the User Assigned is (still) in preview.

2: Configure Authentication for your function

This is easy but requires a couple of steps.

Find the authentication setting

In the left menu, you can find it under Settings.
Authmenu

Update Authentication Settings

Find and click Add Provider. This will setup everything you need.

Start by selecting Microsoft from the dropdown. Note that there are other IdP:s.

Fill in the rest according to this:

The name is up to you. I would just like to add that you should use an environment identifier in there somewhere.
Make sure you select 401 under Unauthenticated requests, the click Add to complete the configuration.

Back at the Authentication page, you can see that Azure created an Identity for your function. The App (client) ID will be used later. Note that you can only have one identity per Azure Function App. Every function in the App will be protected the same way.

3: The APIm Policy

We now have everything we need and can add the policy the APIm. This policy basically states that we would like to authenticate to a particular App ID using Managed Identity.

Open the Policy you need to update and add this before calling the function, in the inbound policy.

<authentication-managed-identity resource="e23a1800-0000-0000-0000-00000009a0" output-token-variable-name="msi-access-token" ignore-error="false" />
<set-header name="Authorization" exists-action="override">
<value>@("Bearer " + (string)context.Variables["msi-access-token"])</value>
</set-header>

The GUID value for the resource attribute is the App (client) ID of your function, simply paste yours instead of mine from the example.

4: A successful test

Use your favorite way of invoking the API and then call it. You do not need to change anything on the caller’s side. The API client does not need to update anything related to authentication.

If you want to make sure your authentication is working properly, remove the policy and call the API again. If everything is working properly, you should receive an authentication error.

Automation using CI/CD

I made a blog post about this. You can read it here.

Using the AppGw in front of APIm – part 2

This is the sequel to my previous post Using AppGw in front of APIm, in which I showed how to setup an Application Gateway (AppGw) in-front of an APIm instance.

In this post I will show how you should (could) configure a health probe, configure the firewall and lastly how to secure your APIm to only accept calls that has been routed thru your AppGw.

Configuring a health probe

Why do you need this? A health probe is used by the AppGw to see which services in a backend pool is healthy. If you do not have more than one instance in a backend pool, perhaps you do not need this feature. If you have multiple instances, the AppGw will only send requests to the healthy instances. This is basic load balancing.

To configure a healthprobe for APIm you can use the “status” service that is available in all APIm instances. You can test it by sending a GET to https://{yourAPIminstanceFQDN}/status-0123456789abcdef. If you receive 200 Service Operational, then you know the service is healthy.

We can use this call to get the APIm status in our health probe.

Setting it up

Start by clicking “Health probes” in the left menu.

The find and click + Add at the top of the new blade.

Set the values for the health probe like this:

  • Name: The name of the probe.
  • Protocol: HTTPs (you do not use HTTP)
  • Host: The FQDN of your APIm instance, usually servicename.azure-api.net.
  • Pick hostname from the HTTP settings: I use NO, you could use YES if you know what you are doing.
  • Pick port from the HTTP settings: I use YES, because I know that the port is set there.
  • Path: Set to /status-0123456789abcdef

Leave the rest as is but make sure you select your HTTP setting you created in the previous post.

End the configuration by testing it. Click Test.

It tests the setting:

And hopefully, it works.

The firewall

This is so easy; it might not even need to be documented.

If you configured the firewall according to the steps in part one, you are already protected but I will go thru the different settings and provide some experience.

This is the basic configuration:

Basic stuff

Tier should be set to WAF V2. The standard is cheaper but does not contain the WAF.

Firewall status: should be enabled but you could disable it in DEV to know if a caller is locked out because of the firewall or not.

Firewall mode: should be set to Prevention. You do want to keep the bad people out, to prevent them. The other setting will just log a bad person.

Exclusions

This is where you configure the WAF to not block calls based on “strange data”. The firewall scans the incoming request for “strange data” or junk-data if you will. A long string of letters, such as an auth-header of a cookie can be considered strange, and the firewall will reject it. You might, therefore, exclude some settings.

The official documentation gives some examples. I always add: Request Header Name, Starts with, Auth to eliminate any authorization issues.

Global parameters

Note that these settings are global. All incoming calls will be scanned using these settings.

Inspect request body: If you turn this on the WAF will automatically scan incoming requests for strange data. For instance, if the incoming request is marked as Content-Type: application/json, the WAF will validate the JSON and reject it if the JSON is malformatted.

Max request body size: Here is a big limitation of the WAF. If you turn on inspection, you cannot accept calls bigger than 128 kb. I recently had a project where the caller wanted to send files in excess of 20 mb as request bodies. We had to device a workaround to keep the WAF inspection turned on for everything else. The settings are global.

File upload limit: If you can get your caller to send the messages as file uploads instead of request bodies, the upper limit is 100 mb.

Rules

Click the Rules tab at the top of the blade.

The basic setting is to use the max version of OWASP to be protected from the bad people. For more information on OWASP visit their website.

You can leave the Advanced rule configuration as disabled for now. This feature is useful if your callers are expressing issues and you need to disable a certain rule to allow the calls. Just find the affected rule and uncheck it.

Please be aware that: these settings are global and limits your security baseline. Try to update the caller instead.

Secure your APIm

The WAF has its own IP address, and you can use that for IP-whitelisting. You can also have the AppGw set a custom header and have APIm look for that header. This method will not be used here but look under “Rewrites” in the left menu.

Find the IP address

To find the IP address of your AppGw, look under Overview and to the right you will find the Frontend Public IP address:

In my case it is 20.74.19.2.

Update APIm global policy

Switch to your APIm instance and select APIs in the left menu. Then select All APIs (this is the global policy). Lastly select Add Policy under Inbound processing.

Choose Filter IP addresses and in the new page, choose Add IP filter.

Since we will not be using a range of IP addresses, just fill in the first box with the IP address of your AppGw.

This will only allow calls from that IP address. The policy file will look like this:

<inbound>
<ip-filter action=”allow”>
<address>20.74.19.2</address>
</ip-filter>
</inbound>


If someone calls your APIm directly they will get an error message. Here is an example:

Conclusions

There are other useful features for you to explore. For instance, you can hook up the AppGw to a Log Analytics instance and look at the data being logged. This is very useful if your callers report errors due to rules or message inspection. You can also use it to show that the firewall stops incoming malicious calls.

I have found this service a useful and welcome addition to APIm in Azure, and I encourage you to try it out in your API platform.