Using OAUTH 2.0 in Logic Apps

OAUTH 2.0

There are many scenarios where you need to call a service that implements OAUTH 2.0. It has support for roles and claims for instance. Out of the box support for OAUTH 1.0 is really easy and there are many walkthrus on this topic. I will show how to configure a Logic App to use OAUTH 2.0.

This is also related to my earlier post Getting a bearer token from AAD using Logic Apps where I show you how to get a OAUTH 2.0 token using Logic Apps.

The scenario

Someone has setup a service that handles sensitive data. Simply protecting it using an API key is considered too low a level of security. The provider has setup an Application Registration in Azure AD and provided you with a ClientID, Client Secret and the Scope. All are needed to authenticate.

How this is setup in AAD is out of scope in this post.

The solution

We decide to use Logic Apps and an HTTP connector. It has built in support for OAUTH 1.0 but we are going to use 2.0.
Here is a mock-up of the settings, lets go thru them.

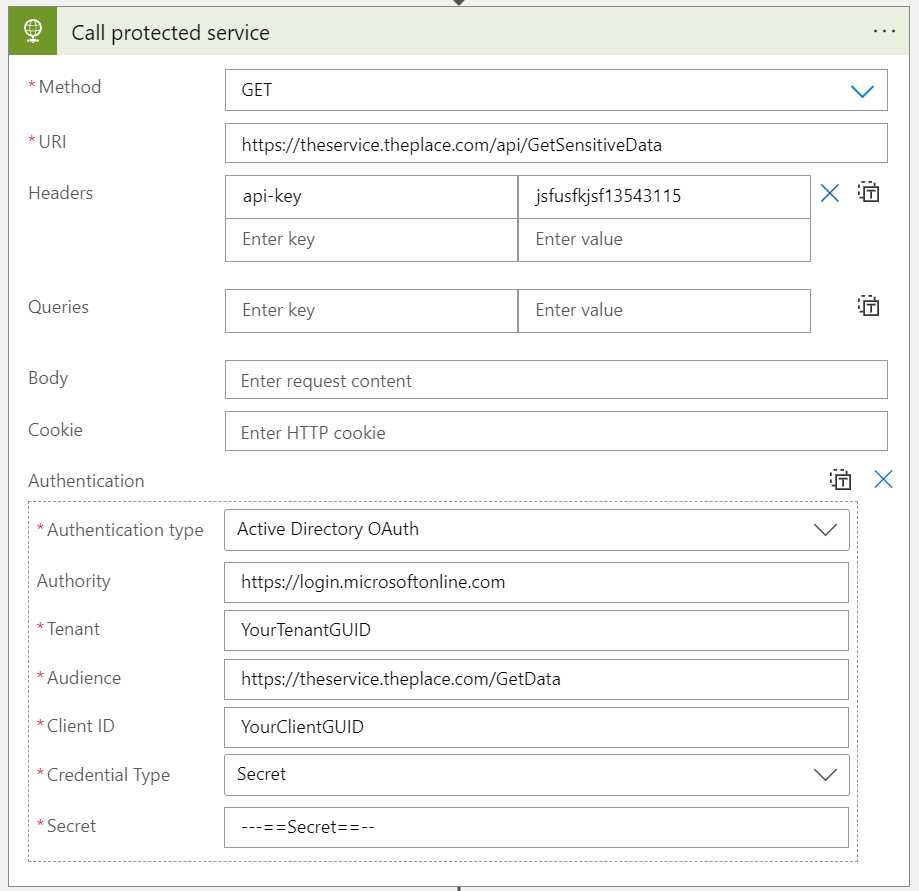
  • URI: The URI of the service you need to call.
  • Header: api-key: You usually need to provide an API key when calling an API. This setting is specific to the service you need to call.
  • Authentication Type: Choose Active Directory OAuth
  • Authority: Set to https://login.microsoftonline.com when using Azure AD
  • Tenant: Your Azure AD TenantID
  • Audicence: Provide the Scope you have been sent. Make sure to omit the /.default at the end of the scope string, if present.
  • Client ID: The Client ID you have been sent.
  • Client Secret: The Client Secret you have been sent.

That is actually it!

Some notes

Scope

The strange and hard part for me was finding how to configure the Scope. First off you put the Scope as Audience, which feels strange. Then you must provide the base Scope. This was different for me.

When you use Postman to get an OAUTH2.0 token you send the scope with a /.default at the end of it to say “give me claims for the default scope”. When I set the property like that I got an error. You need to remove the suffix.

Authority

This hard to find in the documentation, but the setting makes sense. If you are using standard Azure (not US military, China or Germany) this is always set to https://login.microsoftonline.com. You can find the other settings here.

Getting a bearer token from AAD using Logic Apps

Why?

You can use the built in authentication when calling, for example, external APIs. It is one of the best features of Logic Apps. Sometimes you might need to get the auth token anyway. Such as when you think Logic Apps does not support OAUTH 2.0 (Thank you Mötz Jensen for helping me understand it.)

How?

You need to get the usual things: Client ID, Client Secret and audience, or scope depending on the version of OAUTH you need to use. For version 2.0 you need to use scope. Please replace scope with audience in the examples below.

In my example I will use the following settings (pseudo-real):

Property Value
Client ID 0352cf0f-2e7a-4aee-801d-7f27f8344c77
Client Secret Th15154S3cr32t!
Scope https://api.myhome.com/.default
Tenant ID a2c10435-de68-4994-99b2-13fed13bdadf

Configuring a call

Create a Logic app HTTP step and set the following properties:

Property Setting
Method POST
URI https://login.microsoftonline.com/tenantID/oauth2/v2.0/token
Headers
Key Value
Content-type application/x-www-form-urlencoded

The body is a bit more tricky. You need to create a URL-string with login info. It is not that hard. Just type the property name, set a = sign and the add the property value. Inbetween properties you put a & sign (like a URL).

Using my values from above, the resulting string will look like this:

Client_Id=0352cf0f-2e7a-4aee-801d-7f27f8344c77&Client_Secret=Th15154S3cr32t!&grant_type=client_credentials&scope=https://api.myhome.com/.default

Remember to add the grant_type=client_credentials and you must not use any line breaks. It is just a long string.

Result

Looking at this in logic apps, the step looks like this:

Using the token

To use the token in a call you need to do two things.

  1. Get the token value from the output of the Get Token step.
  2. Add the token as a header to the call you need to make.

Get the token value

To make things easy I used a Parse JSON step and provided this schema:

{
    "properties": {
        "access_token": {
            "type": "string"
        },
        "expires_in": {
            "type": "integer"
        },
        "ext_expires_in": {
            "type": "integer"
        },
        "token_type": {
            "type": "string"
        }
    },
    "type": "object"
}

Use the token value

In this case I am calling an API that expects an OAUTH 2.0 token. I configured the step like this:

The short-short version

Issue a call to your AAD using an application/x-www-form-urlencoded body. Making sure the body is one long URL-encoded string.

My US Tour :-)

Not exactly. I am going on a trip for work to St Louis and Nashville and since meetup.com is an awesome, global service I reached out to the local groups. They welcomed me and now I have two sessions lined up. Very Happy!

The session: Api management 101

The topic
An introduction to how Azure API management can help you take control of your organization’s APIs.
APIs are built and published everywhere, they can handle different data, authentication, and paths, making your APIs easier to use and re-use. Security, documentation, users, even sign-up can be handled directly.

Who is this aimed at?
Developers or architects working in a mid-to-large organization that uses APIs to exchange data internally or externally. You do not need any prior knowledge about Azure API management.

Friday, December 9th St Louis

Hosted by St Louis Azure User Group

Microsoft Technology Center – @4220
4220 Duncan Ave #501 · St. Louis, MO

Sign up here.

Tuesday, December 13 Nashville

Jointly hosted by Nashville .Net User Group and The Nashville Microsoft Azure Users Group

Vaco Nashville
5501 Virginia Way Suite 120 · Brentwood, TN

Sign up here

The code and labs

All the code shown in the sessions can be found in this handly GitHub Rep.

The parts of a SAS Key

Whenever I generated a SAS key for allowing access to a storage I have always wondered what all the different parts actually mean, today I found out.

(Source: MS Learn I added some information)

Lets look at this generated key: https://myaccount.blob.core.windows.net/?restype=service&comp=properties&sv=2021-06-08&ss=bf&st=2015-04-29T22%3A18%3A26Z&se=2015-04-30T02%3A23%3A26Z&srt=s&sp=rw&sip=168.1.5.60-168.1.5.70&spr=https&sig=F%6GRVAZ5Cdj2Pw4tgU7IlSTkWgn7bUkkAg8P6HESXwmf%4B

Parameter Example Description
Resource URI https://myaccount.blob.core.windows.net/?restype=service&comp=properties Defines the Azure Storage endpoint and other parameters. This example defines an endpoint for Blob Storage and indicates that the SAS applies to service-level operations. When the URI is used with GET, the Storage properties are retrieved. When the URI is used with SET, the Storage properties are configured
Storage version sv=2015-04-05 For Azure Storage version 2012-02-12 and later, this parameter indicates the version to use. This example indicates that version 2015-04-05 (April 5, 2015) should be used.
Storage service ss=bf Specifies the Azure Storage to which the SAS applies. This example indicates that the SAS applies to Blob Storage (b) and Azure Files (f). Also available are Queue (q) and Table (t)
Start time st=2015-04-29T22%3A18%3A26Z (Optional) Specifies the start time for the SAS in UTC time. This example sets the start time as April 29, 2015 22:18:26 UTC. If you want the SAS to be valid immediately, omit the start time.
Expiry time se=2015-04-30T02%3A23%3A26Z Specifies the expiration time for the SAS in UTC time. This example sets the expiry time as April 30, 2015 02:23:26 UTC.
Allowed resource type srt=s Specifies which resource types are accessible via the SAS. This example specifies that the accessible resource is in Blob Storage. Service (s), Container (c) and Object (o).
Permissions sp=rw Lists the permissions to grant. This example grants access to read (r) and write (w) operations.
IP range sip=168.1.5.60-168.1.5.70 Specifies a range of IP addresses from which a request is accepted. This example defines the IP address range 168.1.5.60 through 168.1.5.70.
Protocol spr=https Specifies the protocols from which Azure Storage accepts the SAS. This example indicates that only requests by using HTTPS are accepted, and why should you accept anything else?
Signature sig=F%6GRVAZ5Cdj2Pw4tgU7IlSTkWgn7bUkkAg8P6HESXwmf%4B Specifies that access to the resource is authenticated by using an HMAC signature. The signature is computed over a string-to-sign with a key by using the SHA256 algorithm, and encoded by using Base64 encoding.

Since permissions (sp) is a little more complex I listed them in a separate table.

Allowed persmission Description
r Read
w Write
d Delete
l List
a Add
c Create
u Update
p Process
i Immutable storage
y Permanently delete
x Enable deletion of versions
t Read/Write blob index
f Filter Blog index

Now I can finally decrypt a signature to find out which access rights have been assigned.

Pitfall when deploying Azure Function v4 and .net 6

I was tasked with setting up a Function environment. The Function was supposed to be hosted as a version 4 (~4) and was written in .net 6. No problem, right? Wrong!

The error

This was the error I got:

Your app is pinned to an unsupported runtime version for '~4'. For better performance, we recommend using one of our supported versions instead: ~3.

To me that seems like a you problem but as ever Azure says it’s mine.

The hunt

I used Bicep to deploy the Azure function, but in order to find all the settings that might be needed I opened the JSON view of the Function in the Azure Portal. The Function was pushed to development by the developer and it was up to me to deploy it in TEST and PROD.

The JSON view is an awesome feature. On the overview page of almost all services, you will find it up and to the right. It’s just a link:

If you click it, you get the JSON/ARM representation of the service:

You can find all the settings that you might want to look up, such as Always On or which server farm it is connected to.

The find

I found this article from Microsoft, which I recommend, but at the same time it should not have to exists. It addresses all kinds of issues you can encounter when using Azure Functions 4.

The solution

You need to tell Azure what version of dotnet you are using. This only needs to be done when using version 4 and .net 6.
Add this setting to your Bicep:

properties: {
     siteConfig: {
         netFrameworkVersion: 'v6.0'
     }
 }

Then redeploy and the error message dissappears.

The grief

Now the pitfall part is that if you look into the JSON view of the Function and try to find that setting … it is null. Even after your redeploy.

So, how are we supposed to know that needs to be set?

Boo! Boo I say.