What is this?
I do not know how many times I have looked for an article explaining the just make it work part of how to authenticate to Azure from an application calling an Azure API. I usually find myself in a very long article on scope and OAUTH vs OAUTH2 vs OpenID.
This is more for me as documentation and perhaps for you as well, and it will not go thru why you should configure anything in a particular way. It is just a make it work.
If you do not know how to create an App Registration (necessary for login) or how to get the information used below, I have created a post here.
The three stages of logging in
- Get the information you need.
- Login to get a Token
- Use the Token in an API-call.
Getting the information you need
You will need:
- A Client ID
- A Client Secret
- The Azure Tenant ID
- Know which resource you are using
The 1, 2 and 3
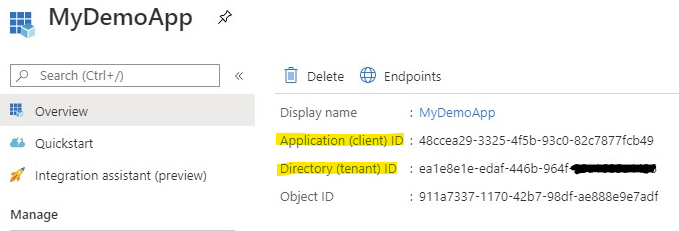
The Client ID and the Tenant ID you can get from the App Registration Overview page of your app.
The client secret is either something you previously saved or something you created. Take a look at my post. Click on “Create the App Secret” in the Table of contents at the top if you need more information on how to create a secret.
The resource
This is the only tricky part.
- If you need to manipulate about 90% of Azure you use
https://management.azure.com/ - If you are login into Storage Account you should/could use
https://storage.azure.com/
Postman
The number one client for calling and testing APIs.
Login to get a Token (with Postman)
Gather all the information you have above and lets get to configuring. You can use variables and environment settings for these.
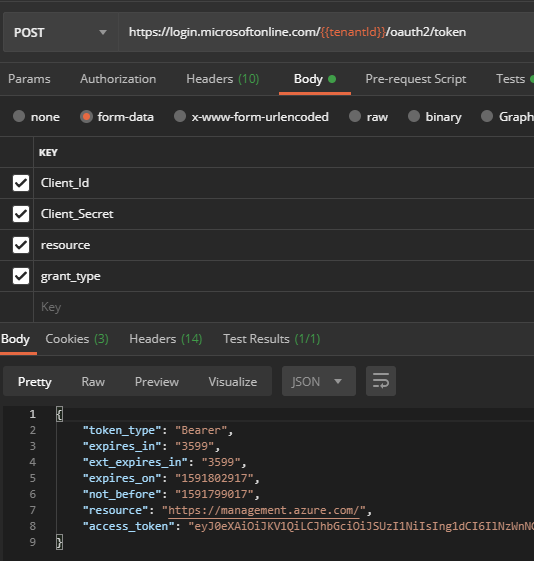
- Set the URI to:
https://login.microsoftonline.com/[Tenant ID Goes here]/oauth2/token - Set the verb to POST.
- Set the format of the body to form-data
- Fill in the data:
client_id: Your Client IDclient_secret: Your client secret (password)resource: see heading just above thisgrant_type: client_credentials
- Click Send and receive your access-token.
Bonus content for Postman
If you want to be fancy, add a script to the test part and assign the token to a local variable for use in other calls.
pm.test(pm.info.requestName, () => {
pm.response.to.not.be.error;
pm.response.to.not.have.jsonBody('error');
});
pm.environment.set("<your variable>", pm.response.json().access_token);
Use the token in the API-call (with Postman)
Now that you have your token, you can use it in other calls.
- Simply click Authorization
- In the dropdown select
Bearer Tokenand paste your token in the token-field to the right. If you used the fancy script, use the variable instead.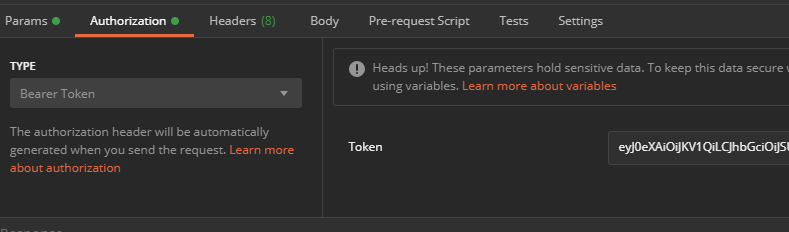
- Done!
One comment
Comments are closed.